

AWS Amplify 101
During the past AWS Summit I attended an interesting session concerning AWS Amplify. The excellent speaker Marcia Villalba (AWS Developer Advocate) quickly convinced me to try this framework. A few days later I had the right opportunity: having the need to keep my son trained with the multiplication tables during these summer holidays, I decided to develop a simple web application with AWS Amplify in order to discover its strengths and weaknesses.
This is the link to the GitHub repository and this is the link to the web application of the project that came out of it. Yes, you can also practice with the multiplication tables.
What’s Amplify?
AWS Amplify is a set of tools and services that allow a developer to build modern full stack applications using AWS cloud services. For example, having to create a React web application, Amplify allows us to manage the development and deployment of the frontend, backend services and the related CI/CD pipeline. For the same application it is possible to have multiple environments (for example dev, test, stage & production). Amplify also allows to integrate some AWS services very quickly into your frontend, writing very few lines of code: one example above all, authentication with AWS Cognito.
Great! There seems to be everything one-man-band developer needs to quickly build an application! Let’s try.
Learn the multiplication tables
As a first step, better clarify the ideas of what we want to achieve: whether they are four sketches on a sheet of paper (my case) or a good mockup in Balsamiq , let’s try to imagine UI & UX of our application.
The main purpose is to train the knowledge of the multiplication tables by subjecting the user to a test: 10 multiplications relating to the same multiplication table, randomly chosen from 2 to 10 (I do not have to explain why I have excluded the multiplication table of 1, right?).
It would be interesting to keep track of errors and time spent answering questions, in order to have a scoreboard with the best result for each table.
Do we want to show each user their own scoreboard and push them to improve themselves? We will therefore have to memorize it and we need an authentication process!
Having the scoreboard of each user, we can also choose the times table object of the next challenge based on the previous results, in order to train the user on the multiplication tables for which he has encountered greater difficulties.
And by magic, the UI of our application appears.

Login 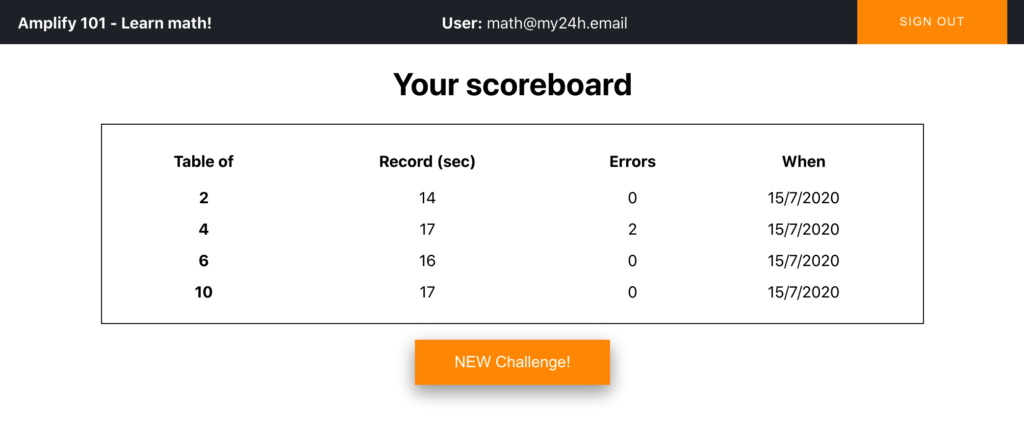
Scoreboard 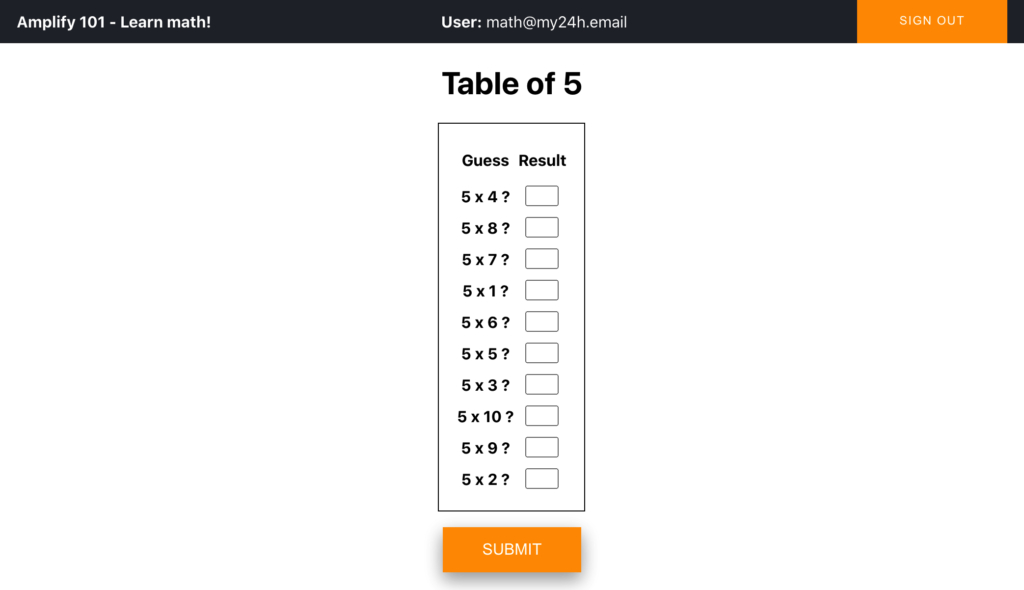
Challenge 
Results
First steps
Now that we have the clearest ideas on what to do, let’s take the first steps. We have already decided to use React and Amplify. Let’s see the prerequisites and create our project, as explained in the official Amplify Docs Tutorial.
The prerequisites indicated by AWS for Amplify are these:
Obviously, an AWS account is required and we will find out, during the deployment of the backend, that we will also need Python> = 3.8 and Pipenv .
To install Amplify CLI and configure it, proceed as indicated. The configuration of Amplify CLI requires the creation of an IAM User which will be used for the management of the backend services.
npm install -g @aws-amplify/cli
amplify configure
We are now starting our React project and its Amplify backend.
# Create React project
npx create-react-app amplify-101
cd amplify-101

# Run React
npm start

# Init amplify
amplify init

# Install Amplify libraries for React
npm install aws-amplify @aws-amplify/ui-react
At this point we will have to edit the src/index.js file by inserting the following lines:
import Amplify from "aws-amplify";
import awsExports from "./aws-exports";
Amplify.configure(awsExports);
Great. At the end of these activities (explained in detail in the official Amplify Docs tutorial ) we have a new React project working and we are ready to create the related backend with Amplify.
Authentication with Cognito
What do we need? Well, since the user is at the center of our application, we can start with the authentication process: this is the point that I said the first “WOW” realizing how simple it is with Amplify.
Let’s add “auth” to the backend using this command and answer a couple of simple questions.
amplify add auth

? Do you want to use the default authentication and security configuration? Default configuration
? How do you want users to be able to sign in? Username
? Do you want to configure advanced settings?  No, I am done.
We ask Amplify’s CLI to publish our backend on the Cloud. The command we (will often) use is:
amplify pushAmplify takes care of everything, going to create what is required on the backend side via a CloudFormation stack.
Now let’s insert the UI in our React frontend: the fastest method is to modify two lines of code in the src/App.js file:
# New import for auth
import { withAuthenticator } from '@aws-amplify/ui-react'

# Change default export
export default withAuthenticator(App)
Done! Our app now provides a complete flow of user registration, login and logout. Obviously the UI elements are customizable and we can change the behavior of our application in response to the login event. Let’s see how.
<AmplifySignUp> allows to customize the registration process of a new user. I chose to request only the email address (which is verified by sending an OTP code) and a password. The email address will be used as a username for logins.
<AmplifySignIn> allows to customize the login process: also in this case I have specified to use the email address as username for access.
<AmplifyAuthenticator> allows to change the state of our app in response to login and logout, through handleAuthStateChange. We can understand if a user has authenticated himself by checking the status {this.state.authState}. We are able to view its username with {this.state.user.username}.
Awesome! Now let’s see how to add some functionality to our app.
Storage
Which app has no data to store? With Amplify we have two possibilities: static content on S3 or NoSQL database with DynamoDB. In our application we need to create a scoreboard table to store the best results of each user. With Amplify CLI the creation of the table is very fast:
amplify add storageBy selecting NoSQL Database and answering a few simple questions about the structure of the table you intend to create, you get it deployed on AWS.
A clarification: Amplify supports the creation of GraphQL API (AppSync) that we will use in the following steps. By specifying the @model directive in the GraphQL schema, it is possible to delegate to Amplify the deployment of a table and all that is needed to manage the related CRUD operations from the frontend. It is a great convenience if we don’t need to manage and customize data with complex application logic.
In the case of our scoreboard , we need to manage data entry exclusively on the backend side. We must also evaluate the results of a test and update the scoreboard accordingly. Frontend access is read-only. For these reasons I preferred not to use the @model directive and manage storage and APIs separately (but still with Amplify).
We need a second table that I called challenges: as can be seen from the name, it used to store the results of an “ongoing” challenge so that we can compare them with the answers of our user and define the outcome of the test. For the same reasons I preferred to manage, also for this table, deployment and API separately.
Backend functions
Let’s start writing the code for the backend: I chose to create the necessary Lambda functions in Python. One of the Amplify features that I appreciate is the centralization of the code of our application in a single repository: frontend, backend and infrastructure code (IaaC) can be easily and quickly modified to adapt to new requirements and new features.
Let’s work on the main function of our app: the generation of a new test and the verification of its results. We use the command:
amplify add functionWe need to provide the name of the function, which runtime we want to use (Python, Node, etc ..) and whether the function must have access to some previously defined resource. In our case the newChallenge function have access to both previously created NoSQL tables.
I used the same command to create the scoreboard function which allows the frontend to view the contents of the user’s scoreboard.
The source code of the backend functions can be found in the amplify/backend/function path of our project. Whenever we go to change it, we just need to push the solution to update the backend on the cloud.
In this post we don’t go deep in the code of the Lambda functions created, which is available in this GitHub repository. Let’s say that both functions respond to GraphQL requests with a JSON populated with the requested data, as well as obviously implementing the application logic (test generation, test evaluation and storage of results).
The reference to DynamoDB tables created previously is provided through an environment variable: the name of the scoreboard table, for example, is provided in STORAGE_SCOREBOARD_NAME.
dynamodb = boto3.resource('dynamodb')
scoreboard_table = dynamodb.Table(os.environ['STORAGE_SCOREBOARD_NAME'])
The invocation event of the function provides the information relating to the GraphQL request to be answered: the typeName parameter indicates if the request is a Query or a Mutation. Let’s see in the next paragraph the last step required to complete our app, the implementation of the GraphQL API.
GraphQL API
We define the last needed backend resource: the APIs with which our React web application will interact.
amplify add apiYou can specify existing API Rest or choose to create a GraphQL endpoint, which is our preference. Amplify takes care of managing its implementation and integration with the frontend.
We just have to worry about defining our application’s data schema. Let’s see it.
We define two basic types: challenge which represents a test and score which represents the results.
The definition of the Query is more interesting: we are going to define two calls to the Lambda functions previously implemented. First one gets an array of scores to display the scoreboard and is called getScores . Second one gets a new challenge (getChallenge). Note that the name of the functions includes a reference to the environment ${env}.
The type Mutation allows to send the results of a test to the API for its evaluation. The Lambda function called is always newChallenge to which some parameters are passed, the unique identifier of the test and the results provided by the user; API response include test results.
How to use these APIs in React? It’s very simple: just specify the required imports (whose code is automatically generated by Amplify) and call them in your frontend.
This is an excerpt from the code used to get your own scoreboard.
import { getScores }  from './graphql/queries';
import { API, graphqlOperation } from "aws-amplify";

......

  componentDidMount() {
    this.fetchData();
  }

  async fetchData() {
    const data = await API.graphql(graphqlOperation(getScores));
    const scores = data.data.getScores
    console.log(scores);
    this.setState({'scores':scores});
  }
Note: the user is not specified in the getScores call. In fact, thanks to the integration with AWS Cognito, the user’s identity is specified directly in the Lambda function invocation event, in the identity parameter.
In the case of mutation, the code used on the submit of a challenge is the following:
import { API, graphqlOperation } from 'aws-amplify'
import { sendChallengeResults } from './graphql/mutations';

....

  handleClick() {
    this.setState({'loadingResults': true})

    // mutation
    const challenge_result = { id: this.props.challenge.id, results: this.state.results }

    API.graphql(graphqlOperation(sendChallengeResults, challenge_result))
      .then(data => {
        console.log({ data });
        this.setState({'score': data.data.sendChallengeResults});
      })
      .catch(err => console.log('error: ', err));
  }
Deployment
We finished! All the components of our app have been made.
The Amplify CLI allows us to deploy our web application with two simple commands:
amplify add hosting
amplify publish
However, I have not chosen this method, wanting to test the potential of CI/CD that Amplify makes available. To do this you need to use the Amplify Console.
We first place the solution source code on a GIT repository. Using the Amplify console we must connect the branch of our repository to implement the pipeline.
Done! Our pipeline is operational and our application is now available online, built and deployed. At first try? Not exactly!
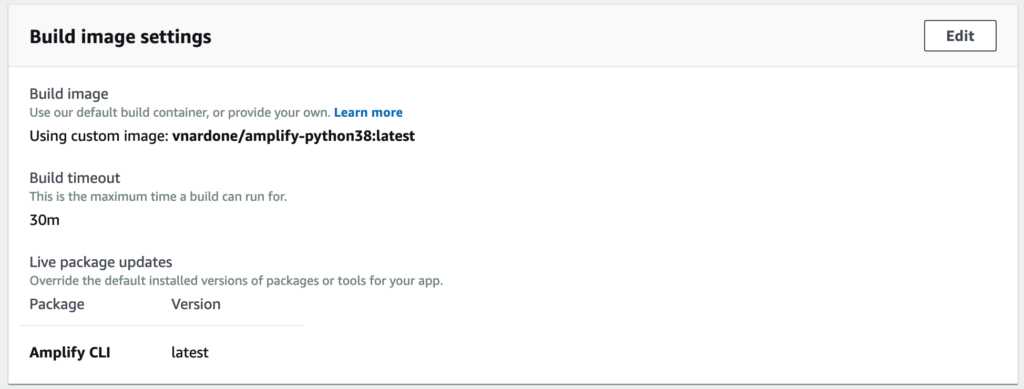
Unfortunately for an unknown reason, the default Docker image used for the build process of the solution is not correctly configured: in fact there is a known problem related to the configuration of Python 3.8 also reported in this issue (Amplify can’t find Python3.8 on build phase of CI/CD).
The easiest workaround I identified is to create a Docker image with all the requirements. Below the Dockerfile.
The image is available on DockerHub and I configured the CI pipeline to use that image. Solved! CI/CD pipeline is now running without errors.
Conclusions
We are at the end of this post: the creation of this simple web application has allowed me to take my first steps with Amplify. What conclusions have I reached?
Definitely very positive opinion! Amplify allows you to create complex and modern applications very quickly, easily integrating the (serverless) services of AWS Cloud. Authentication with AWS Cognito is a clear example, but there is the possibility of integrating many other features, such as Analytics, Elasticsearch or AI/ML.
GraphQL allows us to simply manage the data of our application, in particular for the classic CRUD operations.
The centralization of the source code, frontend, backend and infrastructure (IaaC), allows to keep the entire solution under control and ensures to quickly adapt to new requirements and new features.
Is it a product dedicated to a full stack developer who works individually? Not exclusively! Although Amplify allows a single developer to follow every aspect of their application, also simplifying the operations of DevOps, I believe that even a work team can easily collaborate on a solution by taking advantage of the use of Amplify.
Is it suitable for the development of any solution? I would say no! I believe that the added value of Amplify is, as already mentioned, the ability to quickly and centrally manage all aspects of your application. If the complexity of the backend is such as to include elements not directly managed by Amplify, it is preferable to use other tools or a mixed approach.
For the reasons mentioned here, I believe that the ideal user of Amplify is the full stack developer, the young startups or the more “agile” development companies who need to quickly put in place new solutions or new features.
In conclusion, the next time I have to create a solution, a simple PoC or a more complex web application, I will definitely consider using AWS Amplify!
We had fun? See you next time!