

Time series forecasting with Prophet and Metaflow on AWS
As part of an anomaly detection project, I have recently been able to use two very interesting open source products: Prophet released by the Core Data Science team by Facebook and Metaflow, an excellent framework by Netflix. I used Prophet, in a Metaflow flow, to create forecast models of time series. I decided to write this post to share my experience with these two products, creating a small machine learning project.
A small project
Being able to predict the future trend of a time series is very useful in many applications, from the world of finance to sales. For example, we try to predict the direction of the stock market or the correct supply of resources. This post does not set such ambitious goals, but only wants to explore the possibilities offered by Prophet by creating a forecast model that determines the future trend of daily temperatures. To train the model, I used a dataset that collects the minimum daily temperatures over 10 years (1981-1990) in the city of Melbourne, Australia. The source of the data is Australian Bureau of Meteorology.
The entire source code of the project is available in this git repository
Data exploration
Let’s analyze our dataset with a simple notebook. We use Python and Pandas to load the CSV file.
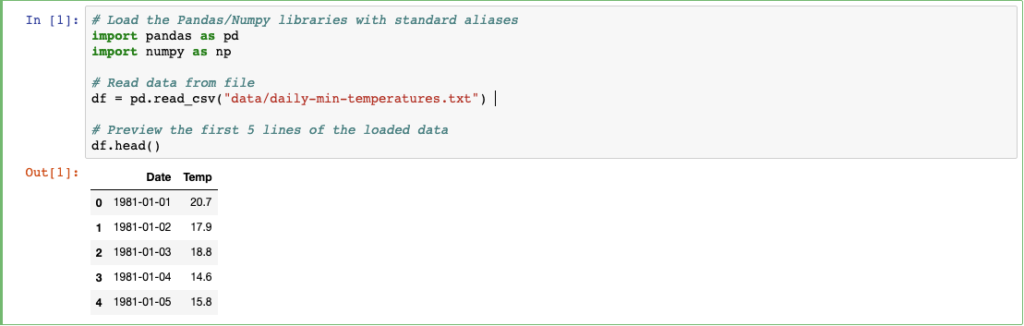
The file has two simple columns, the date of the measurement and the temperature. Let’s try to visualize the data and its distribution.
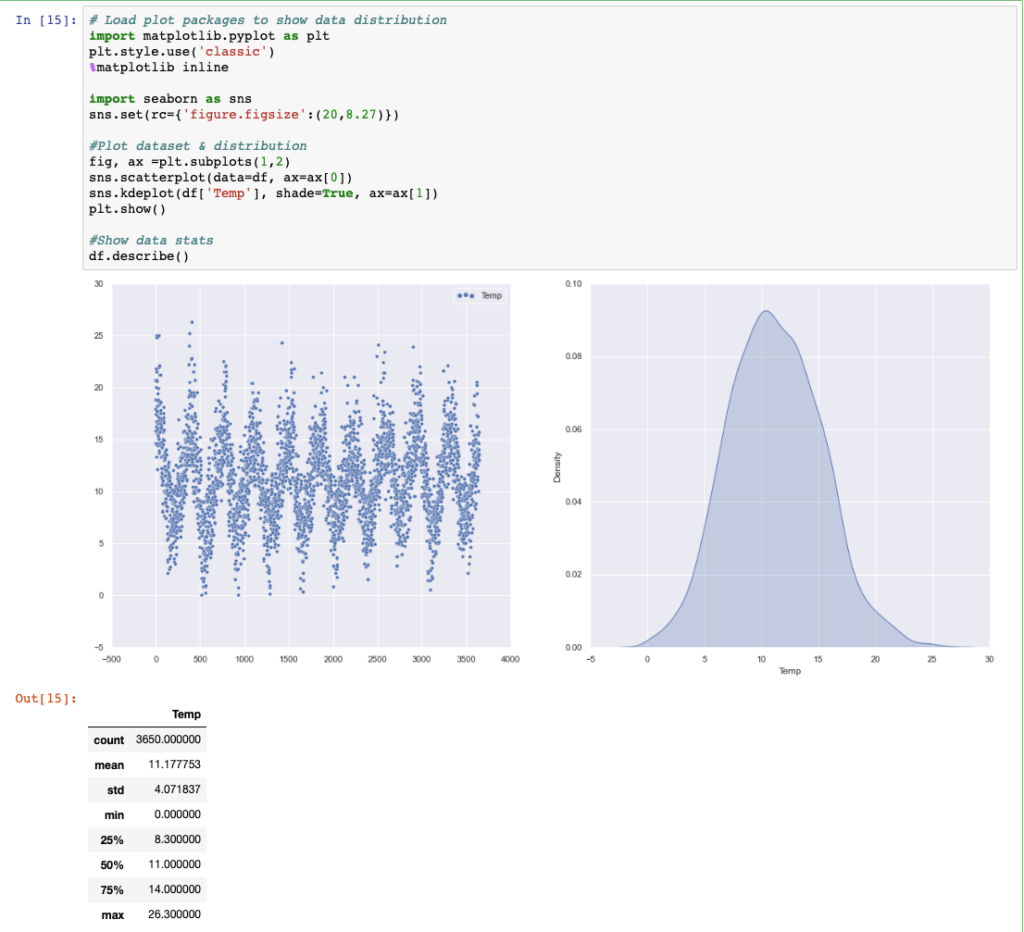
Excellent: the dataset is balanced and the seasonality of the temperature over the years is clearly evident. We can try using Prophet.
Facebook Prophet
Let’s see how simple it is, with Prophet, to make predictions on the trend of time series.
First we will obviously have to worry about installing the Python package.
pip install fbprophetProphet accepts a Pandas dataframe as input of model train process. The dataframe must have two columns, DS – i.e. the measurement timestamp and Y – the measurement value. So let’s take care of arranging our features before submitting them to the model fit method.
m = Prophet()
m.fit(df)
Is that all? Exactly. Prophet prides itself on being an automatic procedure that allows to make predictions on temporal data very quickly, identifying seasonality, trends and eliminating outliers. The fitting operation is also very fast.
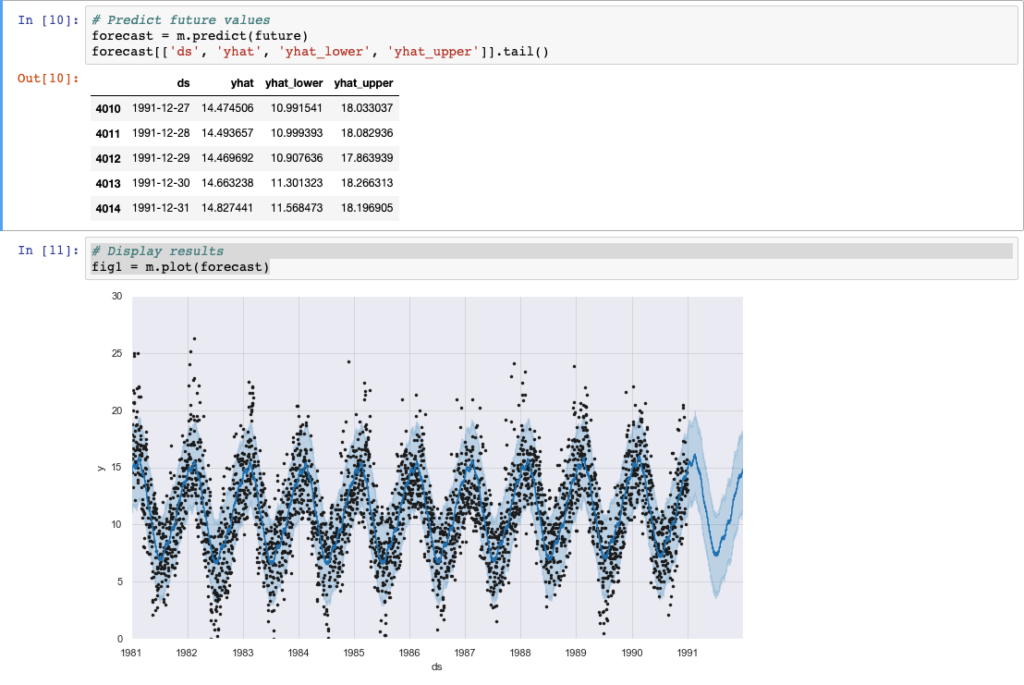
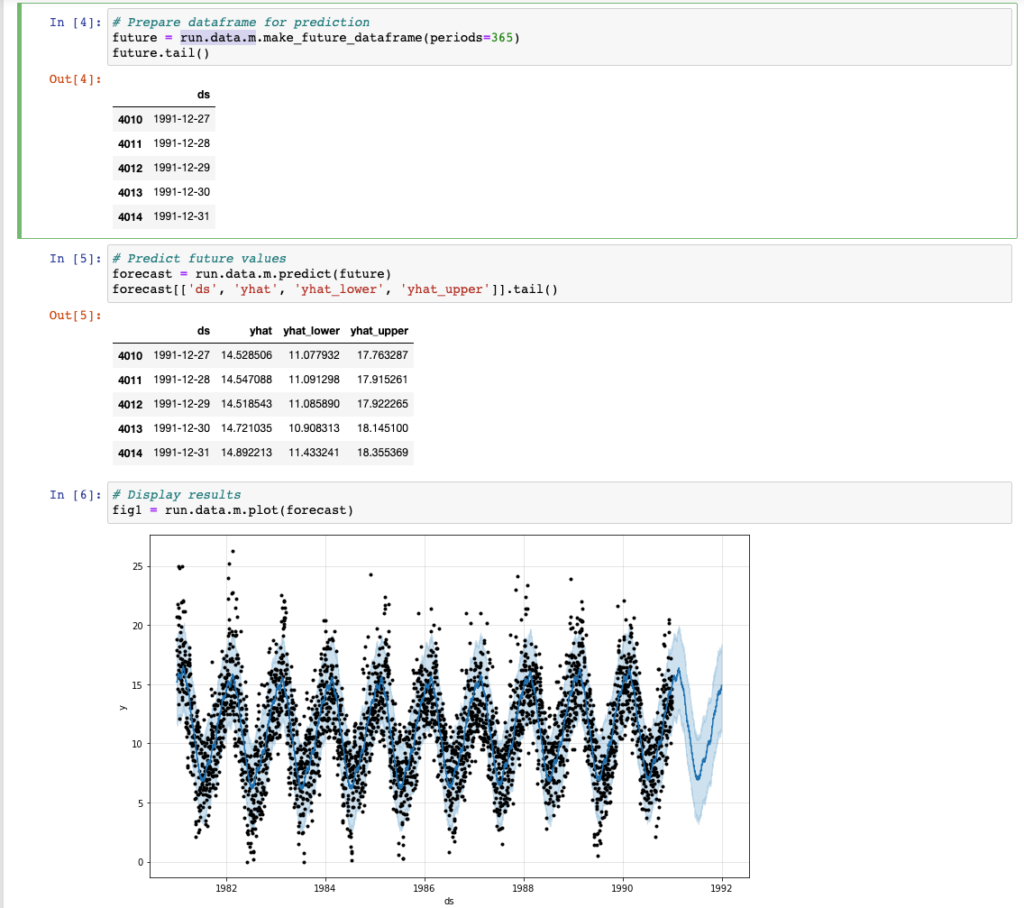
Now let’s try to predict the future trend of our temperatures for the following year. This forecast is obtained by submitting to Prophet a dataframe where the DS column includes the dates of interest.
It is possible to take advantage of the methods already present in the framework to extend the initial dataframe by the desired number of days.
# Prepare dataframe for prediction (add 365 days)
future = m.make_future_dataframe(periods=365)

# Predict future values
forecast = m.predict(future)
Done! The dataframe now reports the forecast (y-hat) of our time series for the requested period.
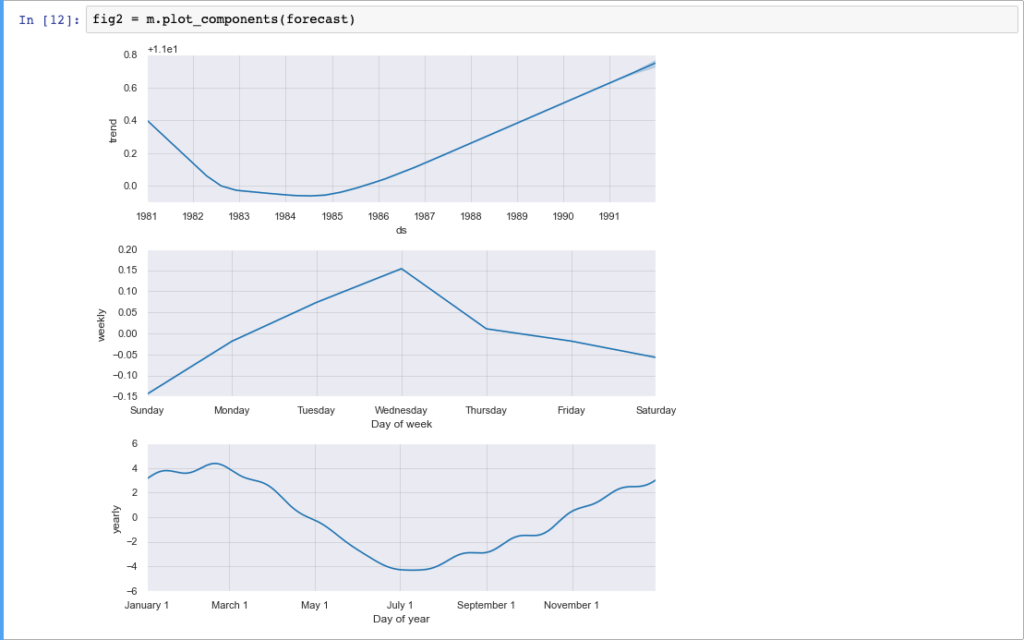
The Facebook framework also allows to quickly draw our time series and its future trend including the confidence range. Even more interesting is the possibility of representing the components (trends and seasonality) of our series on different charts.
Really a very powerful and easy to use tool. However, let’s not fall into the error of considering it too simple: what we have just seen is in fact a “quick start” to grasp the possibilities. For more complex situations or when you want to get better results, Prophet allows to set several options, such as:
- Linear / logistic growth model
- Saturation at a minimum
- Flexibility of the trend
- Changepoints (automatic and custom)
- Seasonality (custom, additive and multiplicative)
- Uncertainty parameters (trend and seasonality)
There are several parameters on which we can act to better adapt our model to the data we are analyzing. The excellent documentation helps us understand its use. We will limit ourselves, for this project, to experimenting with different values for selected hyperparameters, in order to improve our predictions. The process will not be carried out in another notebook: we have validated the approach so we prefer to use a framework that guides us in the process of creating and managing our data science project. The time has come to use Metaflow!
Metaflow
Metaflow helps us design the workflow by breaking it down into steps. Large-scale processing is possible thanks to integration with the AWS cloud. It automatically takes care of the data versioning and it catalogs every single execution of our process. As with Prophet, Metaflow is also available for both Python and R.
Is it always a good idea to use Metaflow? In general, yes, if in our project we need to process data on a large scale (and not exclusively on our laptop) or share the project with other people.
Let’s proceed with the installation:
pip install metaflowOnce installed, Metaflow is configured to run flows locally. We will see later how to configure cloud execution.
What is a flow ? A flow is a series of steps that perform data processing within our project. In the simplest case, the steps are linear, i.e. performed one after the other.
Metaflow also allows you to define steps whose execution takes place in parallel, a functionality necessary to ensure scalability in the cloud.
In each flow, each step “calls up” the next. In the case of parallel tasks, a “parent” step then determines the execution of “child” steps in multiple branches. Each branch can be composed of several steps and in turn can be subdivided further. Branches can implement different processing or they can be identical, but intended to process different batches of data in parallel. At the end of the execution of the tasks in parallel, these are always consolidated in a “join” step, whose purpose is to collect the results (artifacts) of the execution.

We borrow this image directly from the Metaflow documentation: the “start” step determines the creation of several type “a” tasks in parallel. At the end of the execution, these are consolidated in the “join” step, followed by the last step of the “end” flow.
ProphetFlow
Now let’s try to “convert” our notebook, porting it to Metaflow.
Each flow is a script that can be executed by specifying parameters and input data files. The @step decorator defines the steps of our flow, starting from “start” which takes care of loading the data from the CSV file into a pandas dataframe. In the next step we take care of training the Prophet model, which will be followed by the final “end” step.
IncludeFile allows you to attach a data file to our flow; Parameter is obviously a parameter that we can specify at runtime.
So we made a very simple example, to introduce some Metaflow concepts. Let’s try and run it:
python src/ProphetSimpleFlow.py run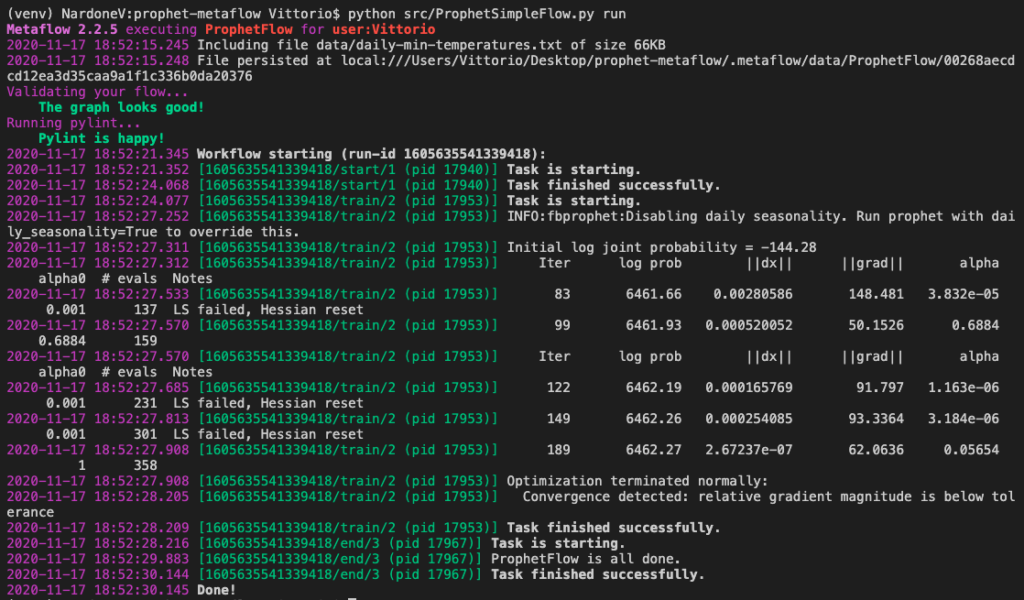
As you can see, at each execution Metaflow takes care of validating the steps of our flow and the related source code (code linting). All steps (or tasks) are performed in sequence. An interesting aspect of Metaflow is also the possibility to resume the execution of a flow from a specific step, for example in case of error.
At the end of the execution, Metaflow automatically stores all the artifacts (self.*) , therefore also the Prophet model we have just finished training (self.m). Let’s see how to use it in a Notebook.
Using the Metaflow Client in a Notebook
Now that the Prophet model has been created, we can use a notebook to access the flow results and make predictions. We use the methods available in the Metaflow client.
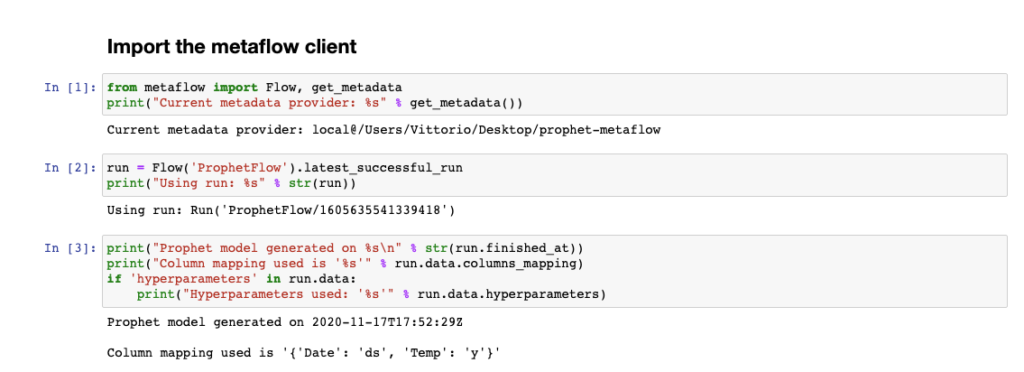
As you can see, for each flow it is possible to consult all the executions and access the related artifacts. Our Prophet model is then accessible as run.data.m. Let’s try to use it.
Similarly to what we saw previously, we are now able to predict the progress of our time series. With the introduction of Metaflow we have versioned the artifacts (the Prophet models) and we are able to access the metadata related to each previous execution of the training process.
Hyperparameter tuning
Let’s try to improve the performance of our forecasting model by acting on some of the hyperparameters that Prophet makes available to us. Let’s consider the following:
- changepoint_prior_scale – a parameter that determines the flexibility of the trend, particularly at changepoints
- seasonality_prior_scale – a parameter that determines the flexibility of seasonal components
Let’s try to combine different values for these parameters and compare the performance of the models obtained. Prophet provides a convenient cross_validation method to evaluate the model’s performance over different time horizons and a performance_metrics method to calculate some very useful statistics, such as MSE and RMSE.
We will use these statistics to find the optimal hyperparameter values. In this section of the Prophet documentation the topic is thoroughly explored.
How do we modify our flow? Evaluating the performance of models with different hyperparameters is obviously an activity that can be performed in parallel. We will therefore create as many “child” steps as there are combinations of the various values of the hyperparameters that we want to test. A join step at the end will collect the performance metrics and identify the best one. So let’s add two steps to our flow:
- hyper_tuning – is the parent step, which determines all possible combinations of hyperparameters and for each of these performs the next step (in parallel)
- cross_validation – is the training and evaluation step performance of a model with a specific combination of hyperparameters
Compared to the previous flow, the step train also differs: we will merge the artifacts produced by the cross_validation steps, identifying the combination of hypermarameters with a lower RMSE value. Then we will use this combination for training the “definitive” model. Here is an excerpt from the edited flow:
The execution of the flow will obviously take much longer as the various combinations of hyperparameters are tested over different time horizons. This is the moment when we can decide to move from running Metaflow locally, to its cloud configuration on AWS. Let’s see how.
Setting Up Metaflow on AWS
As mentioned previously, Metaflow is initially configured to use only local resources for running flows and storing data and metadata.
It is recommended to configure Metaflow to use AWS cloud services: it is possible to execute some steps or the entire code of a flow on AWS, using the AWS Batch service. Data and metadata are stored respectively on S3 and RDS, in a centralized way and can be shared with the team.
The easiest way to do this is to create a CloudFormation stack with all the required infrastructure. The instructions (and the CloudFormation template) are available here. Once the stack has been created, we can configure our Metaflow client to use cloud resources with the following command.
metaflow configure awsThe Metaflow team provides a free sandbox environment for their experiments: request its use at this link . Unfortunately, for this project, I have not been able to use the sandbox as the environment does not allow the download of additional packages, as it does not have outbound connectivity.
So we want to run our flow on AWS Batch? Not so fast. We must consider that we are using a package – Prophet – which must be installed as it is not present in the docker image used by default.
There are two ways to solve this problem: use integration with Conda that Metaflow provides or use a different docker image.
I personally preferred to use this second route, as I ran into several compatibility issues and long runtimes using Conda.
Let’s see how to build a docker image for this purpose.
After we have built the image and deposited it into an accessible repository, we can run our flow on AWS Batch with the following command. The image used in this project is available at dockerub .
python src/ProphetFlow.py run --with batch:image=vnardone/prophet-metaflowThat’s right: with a simple parameter at runtime it is possible to run our flow entirely on AWS, using more computing resources than our laptop. The method of accessing the artifacts (the Prophet model) will be identical even if these will obviously be stored in the cloud: in fact we will use the same Notebook seen previously to make predictions without realizing, in fact, that we are using cloud resources instead of local ones.
Alternatively, you can only perform the steps that require more computational resources on AWS Batch, using the @batch decorator. This will be placed before each step that you intend to perform in the cloud.
@batch(image='vnardone/prophet-metaflow')
@step
def cross_validation(self):
   ....
Personally, I prefer the latter approach, which allows you to delegate the most expensive steps in computational terms to the cloud, while running the other steps quickly locally. This way it is also possible to specify different docker images for each step if necessary.
Conclusions
We have come to the end: in this post I talked about a simple ML project that embraces very powerful open-source products that deserve further study. While Prophet is obviously a useful procedure for a specific case, time series forecasting, we can use Metaflow in all our data science projects because the framework helps us to keep clean the solution development and deployment process.
After this exploratoin project, I think Metaflow strength and weakness are:
Strength
- Forces the developer / data scientist to perform orderly operations, broken down into steps
- Automatically share process, data and metadata with team
- Process and data are automatically versioned
- Framework hides backend complexity
- Great integration with AWS cloud resources
Weakness
- Conda integration is very slow
- Required AWS cloud resources could be very expensive
Is Metaflow the only framework of this type? No! ZenML and Kedro are also two very valid alternatives. I recommend this great article that compares the three frameworks.
That’s all. Remember that the entire source code of the project is available in this git repository
Did we have fun? See you next time!