

AWS Amplify: code lint & end-to-end testing with Cypress
Back from the summer break, I picked up on AWS Amplify. In a previous article I had talked about my first approach to this AWS framework. In this post I want to deal with the implementation of linter for source code and end-to-end tests with Cypress, obviously automated in the AWS Amplify CI/CD pipeline.
This is the link to the GitHub repository and this is the link to the web application.
Linter
The linter is a tool that analyzes the source code to flag programming errors, bugs, stylistic errors and suspicious constructs.
(wikipedia)
Linter tools allows to increase the quality of the source code. Using these tools in a CI/CD pipeline also allows to deploy an application when its source code meets certain quality levels.
The web application I created with AWS Amplify includes a React frontend and few Python lambdas in backend. For this reason I need two different tools, specific to the two technologies used.
ESLint
One of the best linters I’ve had the chance to test for JavaScript is ESLint: its functions are not limited to test but it includes automatic fix of a large number of problems.
ESLint installation is simple: from the main directory of our project, we can install the linter with the following command:
npm install eslint --save-devOnce the installation is complete, we can run the first configuration wizard:
npx eslint --initYou will be asked for various information: in general you can choose whether to use ESLint for:
- syntax checking
- syntax checking and problem finding
- syntax checking, problem finding and code style checking
This last option is interesting and includes most popular styles, such as Airbnb and Google source code styles. Once the configuration is complete, the required packages are installed. In my case:
"devDependencies": {
    "eslint": "^7.8.1",
    "eslint-config-google": "^0.14.0",
    "eslint-plugin-react": "^7.20.6"
  }
Now that we’ve set up ESLint, let’s check the code:
npx eslint src/*.js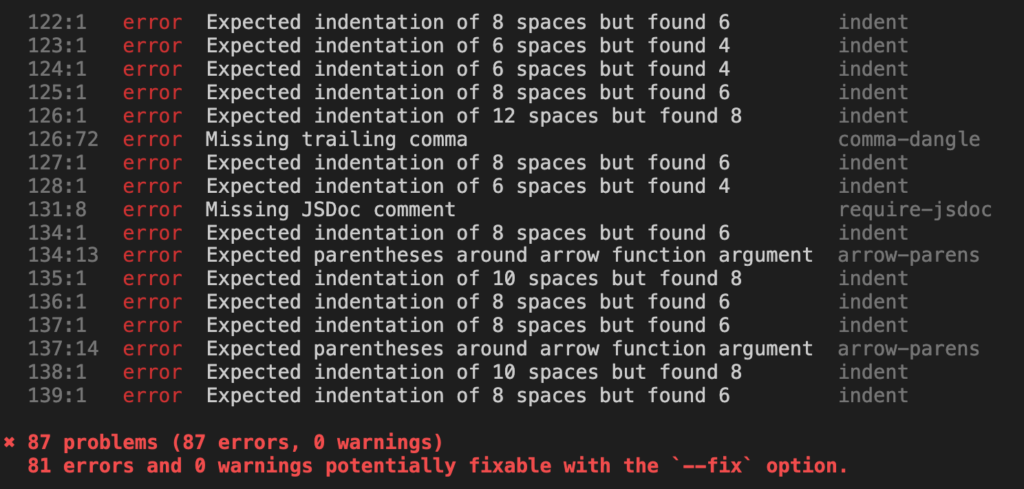
Depending on the options chosen during configuration, the result may not be the most optimistic, revealing a long series of problems.
But as I said initially, ESLint allows us to automatically correct some of these, using the following command:
npx eslint src/*.js --fix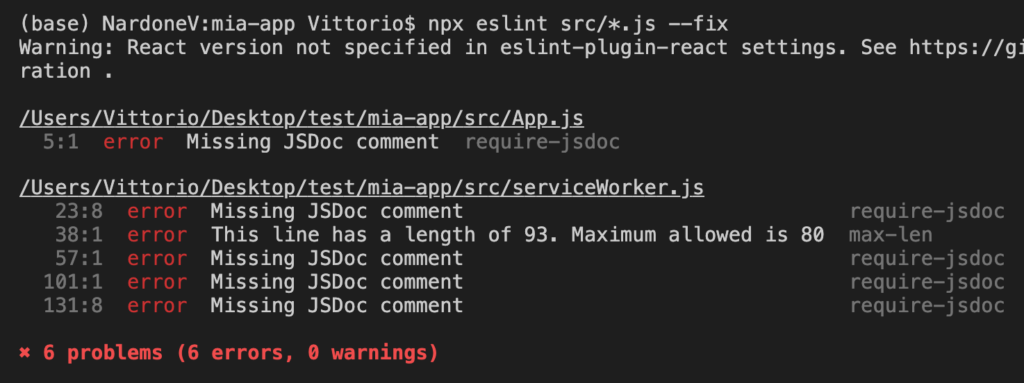
Great! Of the 87 problems initially detected, only 6 require our intervention to be corrected.
We can also decide to ignore some specific problems. If you want, for example, to avoid reporting for missing JSDoc comments, you must modify the rules section of the ESLint configuration file .eslintrc.js.
  'rules': {
    "require-jsdoc": "off"
  },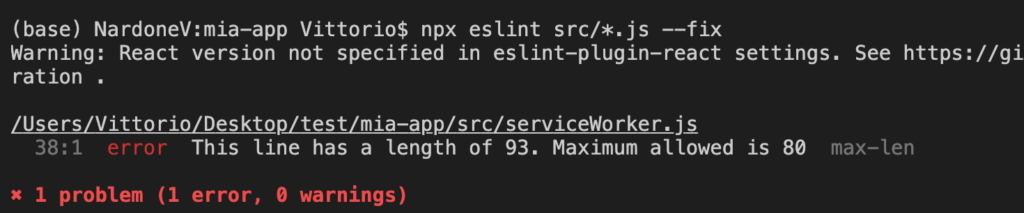
Only one problem remains, related to a line that is too long. We need to fix it manually.
The goal is to automate this process in the CI / CD pipeline, in order to stop the deployment in case some errors are detected.
Let’s configure the pipeline by editing the amplify.yml file like this:
frontend:
  phases:
    preBuild:
      commands:
        - npm ci
    build:
      commands:
        - npx eslint src/*.js
        - npm run build
  artifacts:
    baseDirectory: build
    files:
      - '**/*'
  cache:
    paths:
      - node_modules/**/*
Among the commands of the build phase of the frontend, we insert the command to run ESLint. If it detects a problem, the pipeline will stop automatically.
As far as the frontend is concerned that’s all! For any further information on the use of ESLint, I suggest to consult the excellent documentation.
Pylint
It’s time to check the backend code. Having built some AWS Lambda functions in Python, I chose Pylint for this purpose. Installation is normally done with PIP:
pip install pylintTo parse a file with Pylint just run it specifying the filename as an argument.
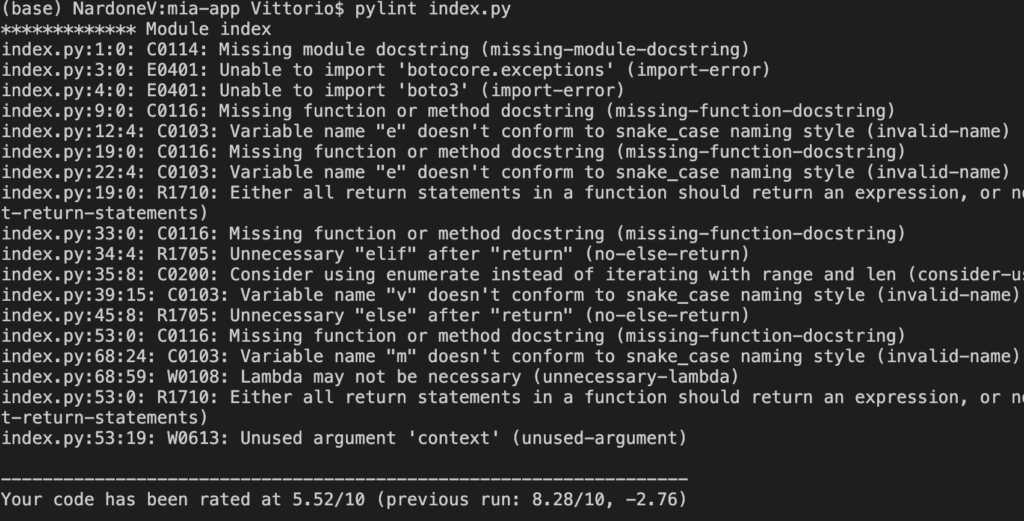
Unlike the tool seen above, Pylint attributes a score (up to 10) to the analyzed code. The score is obviously based on the problems found.
Some problems can be ignored by editing the configuration file. To generate a configuration file to be customized later with your own settings, you need to run the command:
pylint --generate-rcfileThe generated file is well documented and understandable.
In order to integrate Pylint into the AWS Amplify pipeline, the operations to be performed are more complicated than previously seen for ESLint.
First you need to install Pylint in the Docker image used for the backend build phase. As explained in the previous article that I wrote about AWS Amplify, the default Docker image used for the build of the solution is not correctly configured: there is in fact a known problem related to the configuration of Python 3.8 also reported in this issue (Amplify can’t find Python3.8 on build phase of CI/CD ).
The easiest workaround I identified is to create a Docker image with all the requirements. Below the Dockerfile.
Once Pylint is installed, we need to configure the pipeline by modifying the amplify.yml file like this:
backend:
  phases:
    build:
      commands:
        - '# Evaluate backend Python code quality'
        - find amplify/backend/function -name index.py -type f | xargs pylint --fail-under=5
        - '# Execute Amplify CLI with the helper script'
        - amplifyPush --simple
We use find to Pylint all the index.py files of our backend lambda functions. Pay attention to the –fail-under parameter: this instructs Pylint to consider a source code evaluation lower than 5 as failed. In this case the Pylint exit code will be non-zero and the CI/CD pipeline execution is interrupted. With a rating higher than 5, the exit code will be zero. The default threshold is 10, corresponding to a “perfect” source code and honestly very difficult to obtain in the presence of complex applications.
We’ve completed introducing linters to our pipeline. Let’s see now how to automate the testing of our application.
End-to-end test with Cypress
Cypress is a solution that allows you to perform automatic tests of our web application, simulating the operations a user performs via UI. The tests are collected in suite.
Passing the tests ensures proper operation from the user’s point of view .
The Amplify console offers integration with Cypress (an end-to-end test framework) for browser-based testing. For web apps using Cypress, the Amplify console automatically detects test commands on the repo connection, runs the tests, and provides access to videos, screenshots and any other artifacts made available during the build phase.
(AWS)
Installation is very simple:
npm install cypressWith the following command Cypress is started:
npx cypress openThis will involve creating a cypress directory in our project which includes all configuration files and test suites. Some examples are present in cypress/integration . I don’t go into the details of how to build a test suite because there is already a huge documentation about it.
Configuring Cypress for AWS Amplify and Cognito
Let’s see how to properly configure our project to integrate with AWS Amplify.
The configuration file cypress.json is now present in the root of the project and we must edit in this way:
{
    "baseUrl": "http://localhost:3000/",
    "experimentalShadowDomSupport": true
}
The first parameter set the base URL of our web application.
The experimentalShadowDomSupport parameter is very important in the case of React applications using the AWS Amplify Cognito authentication backend and its UI components. In a nutshell, by not enabling Shadow DOM support, we will not be able to authenticate into our application during the testing phases.
The test suite used to verify the login and logout functionality of the web application is the following:
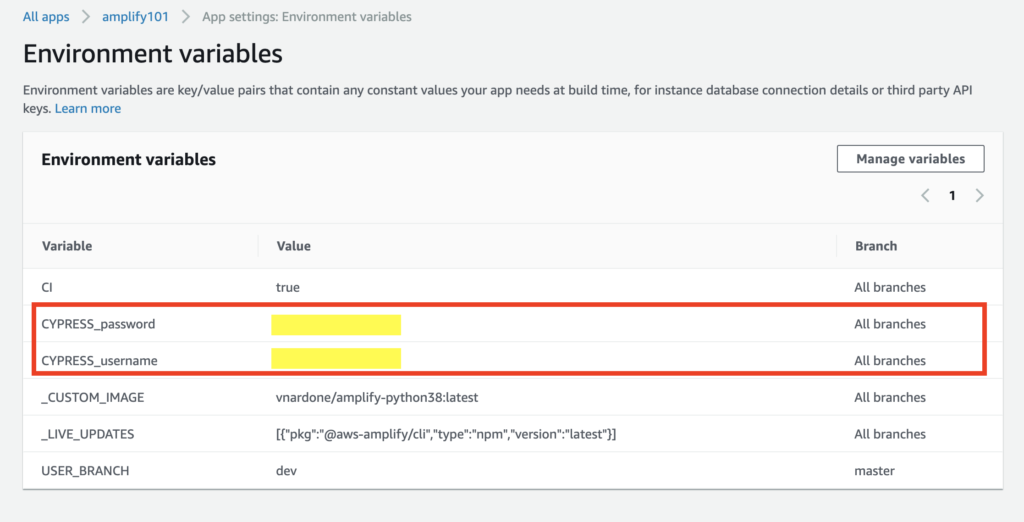
For security reasons, the username and password to be used for testing are not specified in the script but must be defined in environment variables directly on the AWS Amplify console. The variables are CYPRESS_username and CYPRESS_password .
Pipeline Configuration
Last step is pipeline configuration for running the tests, as explained by Cypress. And here’s the complete amplify.yml file.
Again, as with linters, our deployment pipeline will stop if the tests fail.
It is possible to watch execution video of the tests on the AWS Amplify console, by downloading the artifacts. Here is an example.
Conclusions
The combined use of linter and end-to-end test tools allows to release high quality source code, tested as an end user. With AWS Amplify we have the ability to integrate these tools by simplifying DevOps operations and maintaining control of the CI/CD phases.
In conclusion I confirm the impressions of the first post: the next time I have to create a solution, a simple PoC or a more complex web application, I will definitely consider using AWS Amplify! Obviously flanked by Cypress and one or more linters.
Did we have fun? See you next time!