
Your disposable emails on AWS
90% of online services have a registration process which requires to provide a valid email address. It’s required to receive an email with a link to click on. After that you will gain access to the service you were interested in but, at the same time, you will start to receive newsletters, surveys, promotions, etc in your mailbox.
A disposable address is useful in these situations: it allows to complete the registration process and prevents from receiving unwanted emails in the future, keeping our personal mailbox clean.
UPDATE!!
Are you looking for a ready to use disposable email service, awesome API and Slack integration?
try my24h.email
There are several online services that offer disposable email addresses and the most famous is probably Mailinator. However, these services are probably not suitable for professional use in a company and they are often limited. The mail domain used, for example, is sometimes recognized as “disposable” and not considered valid during the registration process.
In this article we are going to create Disposable-mail, a disposable and customizable email service on your own internet domain, using AWS building blocks. The service is totally serverless: EC2 instances are not necessary and only simple lambda functions are implemented.
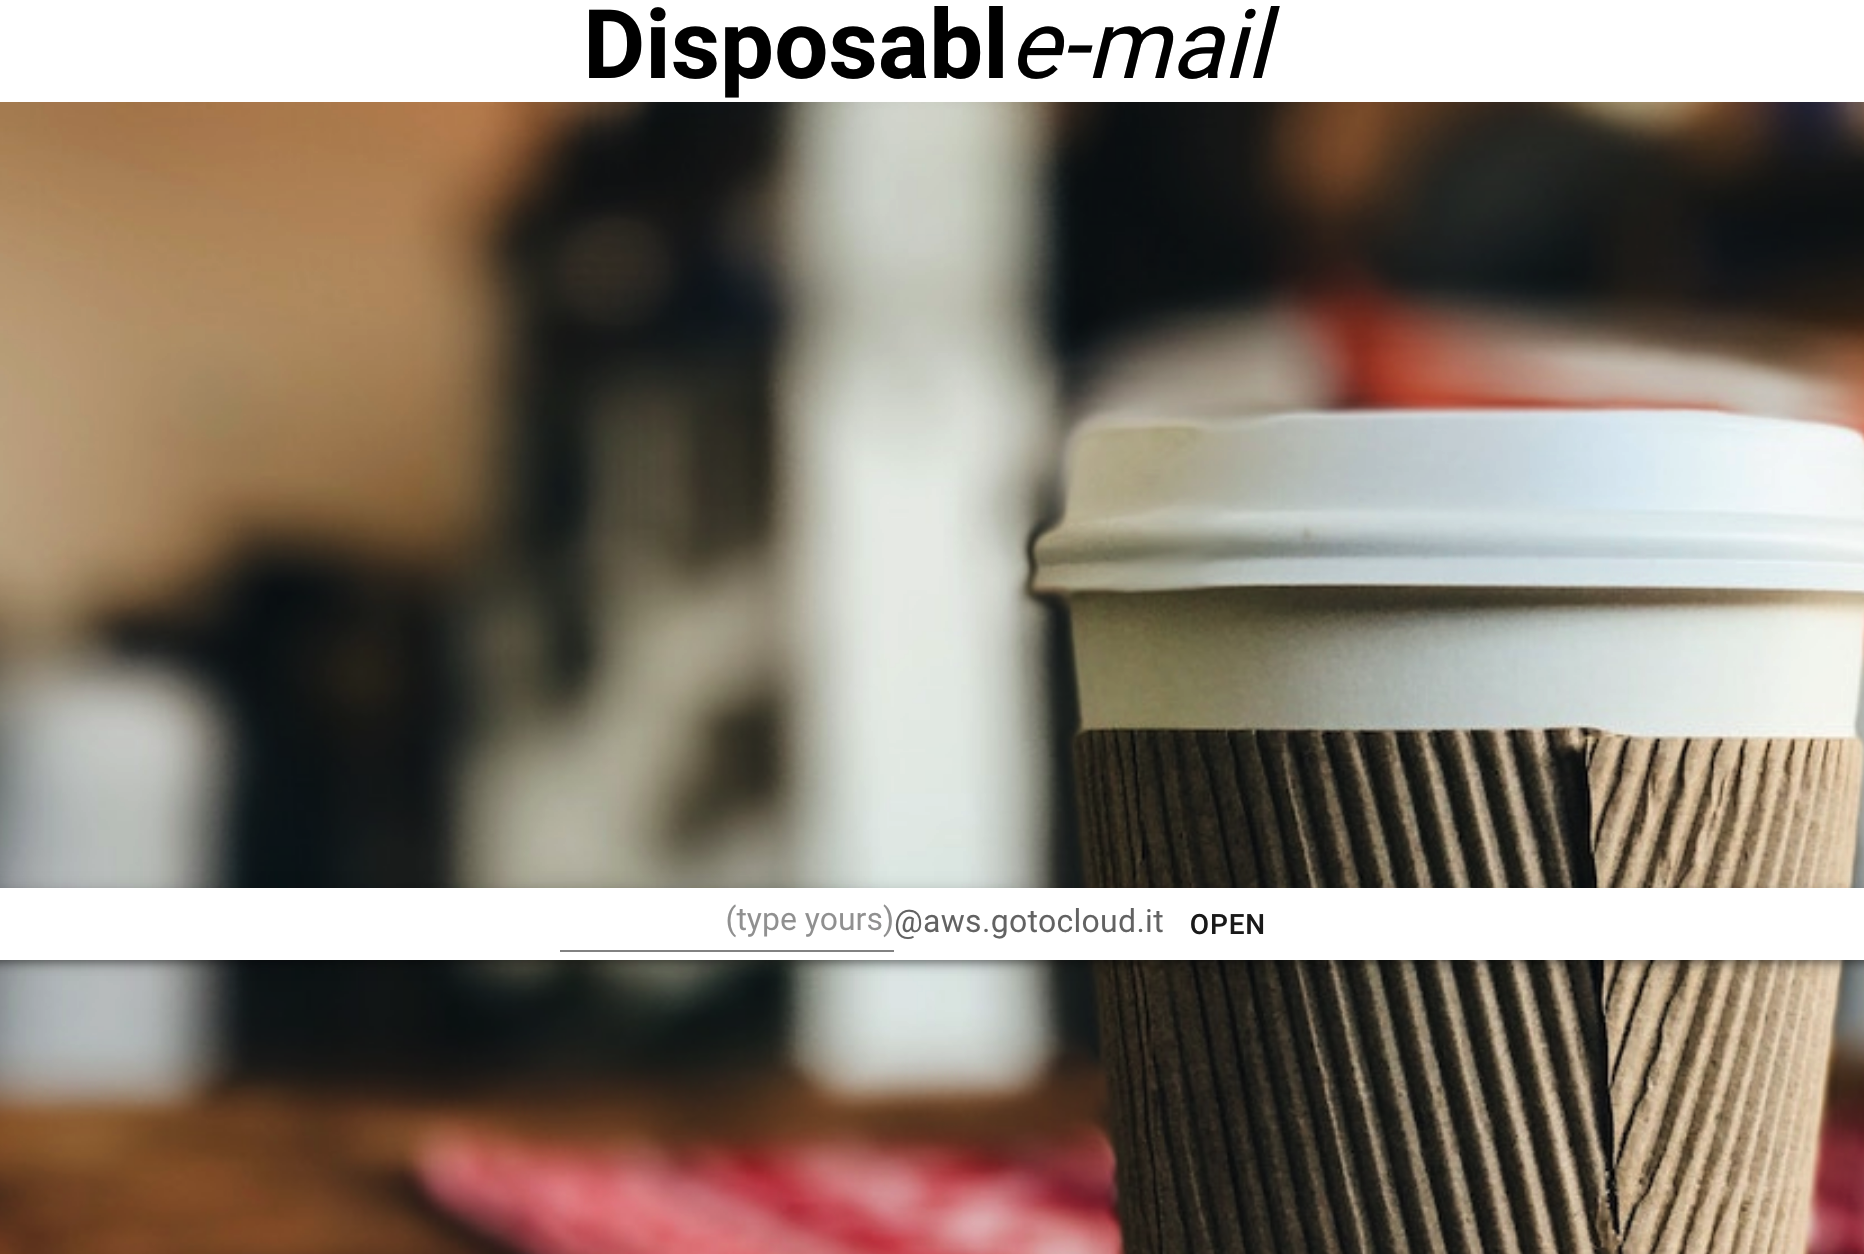
Disposable-mail acts like this:
- Go to the website
- Choose an email address and type it
- The mailbox you have chosen is immediately activated and you can start receiving emails
Do you want to try it now? Find it here: https://www.my24h.email
No need to register yourself or choose a password. The mailbox is valid for one hour and after 60 minutes all the messages received will be deleted and the mailbox will no longer be active.
It is not possible to send emails, only to receive them. Attachments are not displayed (maybe in the next version).
To avoid abuse Google reCAPTCHA is hidden in the login form and this is the reason you need your reCAPTCHA keys.
Requirements
Do you want to create your disposable email service on your own internet domain? Here’s what you need:
- an AWS account
- an internet domain (a third level is better) on Route53 or anywhere it’s possible to configure the DNS zone
- a pair of Google reCAPTCHA keys (site / private) valid for your domain (reCAPTCHA console)
That’s all.
Solution architecture
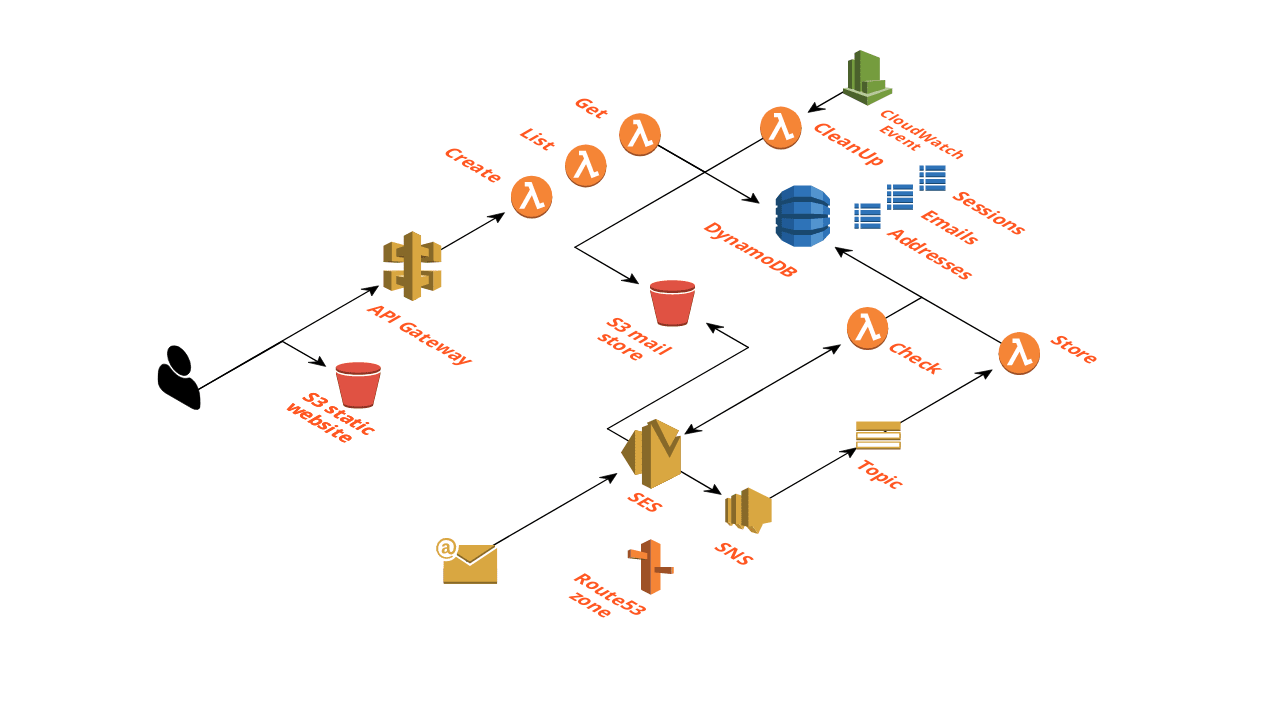
As anticipated, Disposable-mail is totally serverless and, given the nature of these AWS building blocks, we will not have to worry about their management, scalability is guaranteed and it’s “pay per use”.
The layout shows how essentially two workflows exist: the first, totally automated, of receiving, checking, storing and deleting emails. The second, given by the user who accesses the React application and consults his mailbox. The common element o is represented by the S3 bucket where the emails received are stored and the DynamoDB tables where the related metadata are stored.
To receive emails, we rely on the Amazon SES (Simple Email Service) service: we will deal with its configuration in the next paragraph. Some lambda functions take care of managing the flow of emails. Route53 is used to host the DNS zone of our internet domain.
The web application is hosted directly in a public S3 bucket and the API endpoint is managed by the Amazon API Gateway service. Some lambda functions take care of processing requests from clients.
We rely on CloudWatch to periodically perform a lambda function whose purpose is to disable and eliminate expired mailboxes.
First Steps
The first step in the realization of the solution is the correct configuration of the Amazon SES service. The CloudFormation template that we will use for the construction of the entire backend infrastructure assumes that the email domain we have chosen is already correctly configured and verified.
Let’s start the configuration: from the AWS console it is necessary to access the SES service. This service is not available in all AWS Regions: it is therefore possible that you must use a different Region different. For the sake of simplicity, the entire solution will be hosted in the same AWS Region.

Domains displays the list of all internet domains for which the SES service has been configured. We need to add our domain and carry out the verification process.
By clicking on Verify a New Domain we add our domain by specifying its name. As mentioned above, it is better to use a third level domain because all mailboxes will be managed by Disposable-mail.
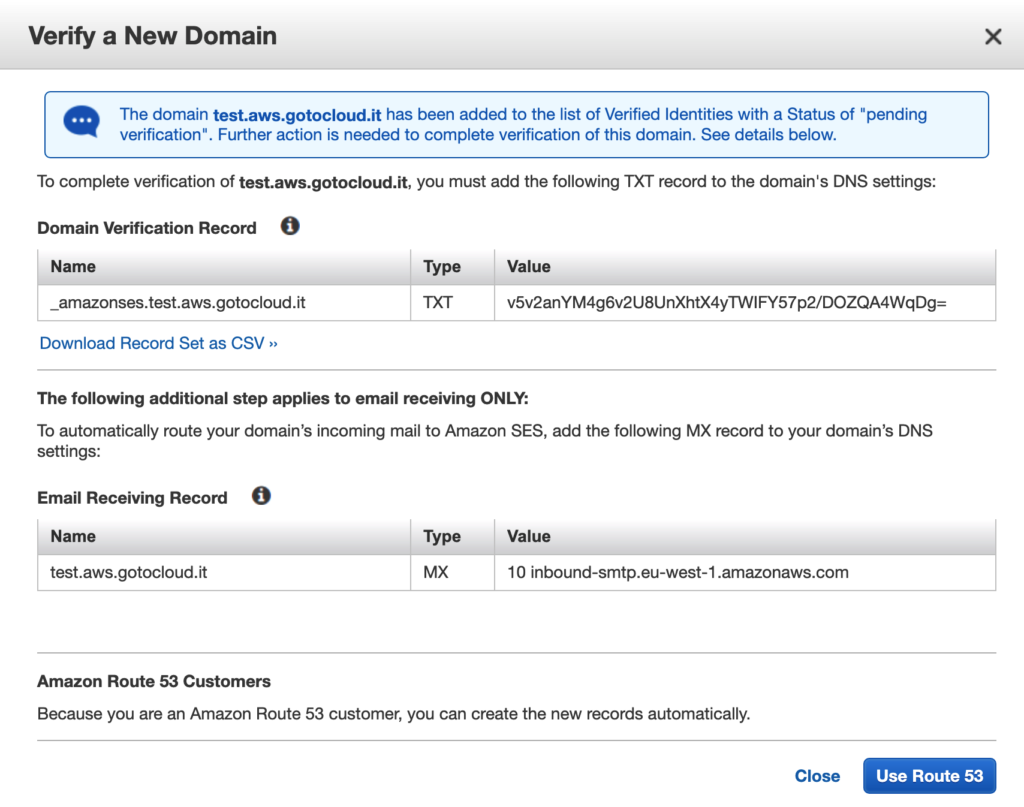
Once the domain is added we need to configure DNS zone. Two records should be added:
- a TXT record required by AWS verification
- an MX record to enable emails receiving
If the DNS zone is managed by Route53, all we have to do is click on Use Route 53: the configuration of the two records will be automatic. Otherwise it is necessary to refer to your provider to modify the zone as shown.
Once the domain has been verified, we will be able to receive emails via Amazon SES.
Backend – Receiving emails
The CloudFormation template creates a new “catch-all” type of email reception rule (Rule Set), that is valid for all email addresses of type <anything>@<your_domain>
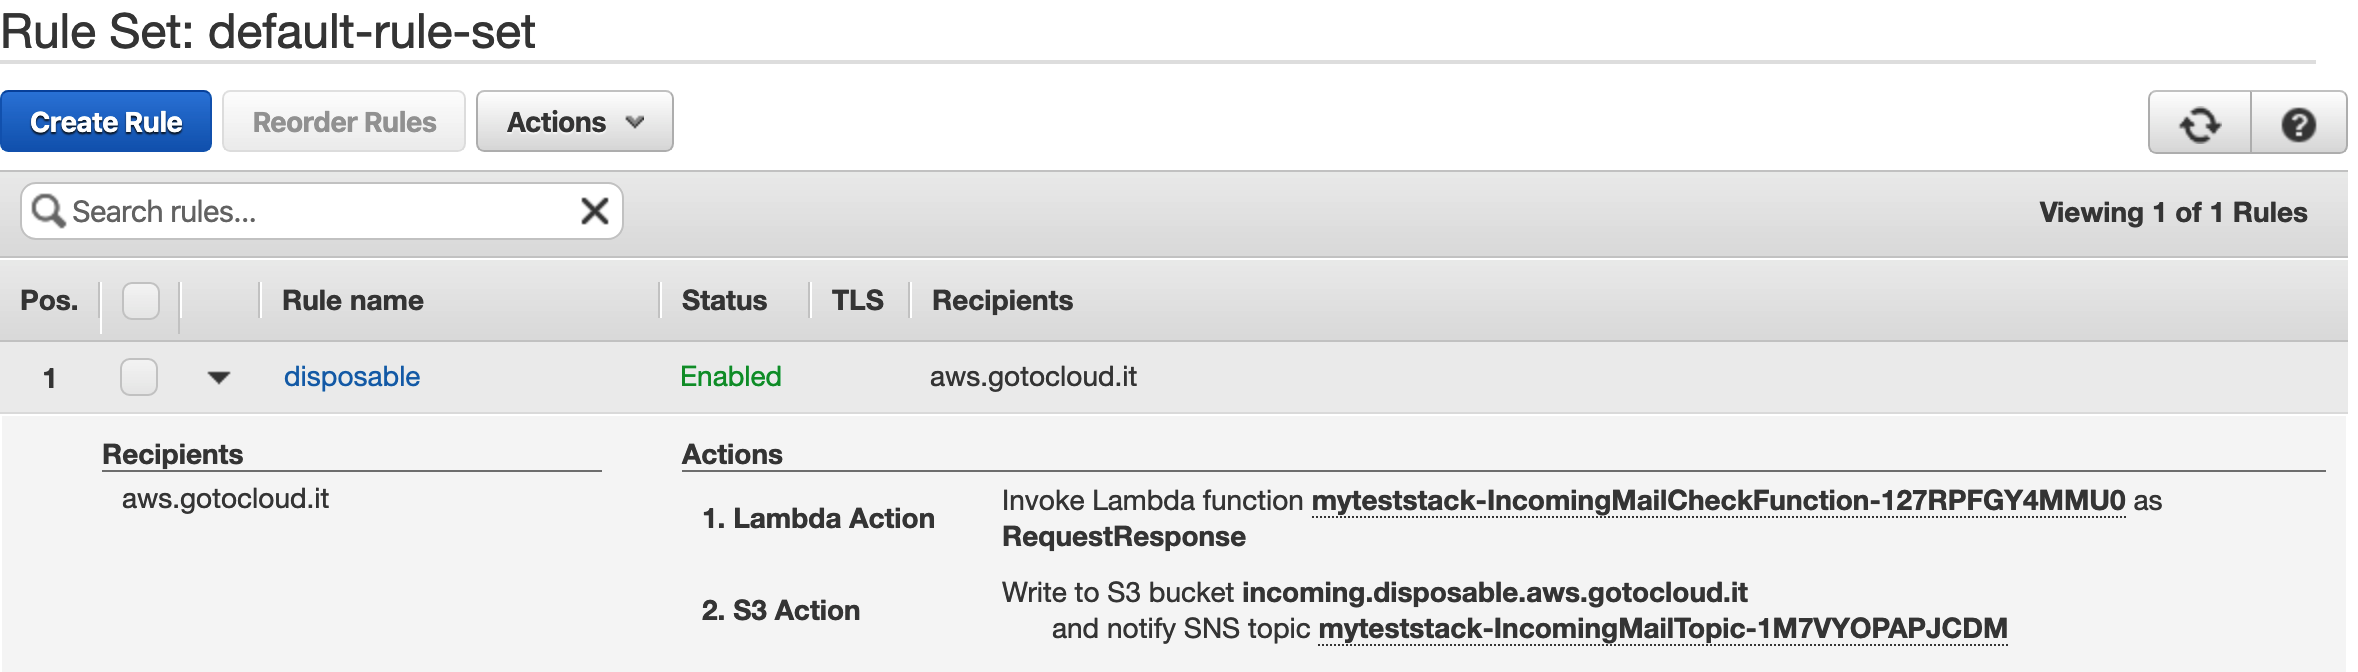
The specified “Recipient” corresponds to our domain.
The first Action invokes a lambda function and verifies its response. The IncomingMailCheckFunction verifies if email destination address is valid and active. Verification result is sent back to SES service: continue to next actions (CONTINUE) or stop the execution (STOP_RULE_SET).
The second Action, performed only if the previous one has allowed it, stores email in the S3 bucket called “incoming.disposable.<domain_name>” and notifies the SNS topic “IncomingMailTopic“.
How is the email address verified? A DynamoDB table is used to store the list of active email addresses and their expiration (TTL). The key of the table is the email address.
## part of IncomingMailCheckFunction, see Github repository for
## the complete functions code.

dynamodb = boto3.resource("dynamodb")
table = dynamodb.Table(os.environ['addresses_table_name'])

def address_exists(address):
  exists = False
  response = table.get_item(Key={'address': address})
  if 'Item' in response:
      item = response['Item']
      if item['TTL'] > int(time.time()):
         exists = True

def lambda_handler(event, context):
  for record in event['Records']:
    to_address = record['ses']['mail']['destination'][0]
    if address_exists(to_address):
       return {'disposition': 'CONTINUE'}
    else:
       return {'disposition': 'STOP_RULE_SET'}
    break;
To complete the analysis of the flow of receiving emails, we look at the StoreEmailFunction. This function takes care of storing the data of the email received in the DynamoDB database, in the “emails” table. The table has a Primary Key “destination” which corresponds to the email address and a Sort Key which corresponds to the “messageId” of the email itself. The lambda function receives notifications from the SNS topic.
## part of StoreEmailFunction, see Github repository for
## the complete functions code.

dynamodb = boto3.resource("dynamodb")
table = dynamodb.Table(os.environ['emails_table_name'])

## Store email details in database
def store_email(email, receipt):
   response = table.put_item(
                  Item= {'destination': email['destination'][0],
                         'messageId': email['messageId'],
                         'timestamp': email['timestamp'],
                         'source': email['source'],
                         'commonHeaders': email['commonHeaders'],
                         'bucketName': receipt['action']['bucketName'],
                         'bucketObjectKey': receipt['action']['objectKey'],
                         'isNew': "true"
                  }
   )

def lambda_handler(event, context):
    message = json.loads(event['Records'][0]['Sns']['Message'])
    store_email(message['mail'], message['receipt'])
The SNS notification contains the name of the S3 bucket and the objectKey used to store it. By saving the information in the DynamoDB table, it will be possible to retrieve the content of the email later.
The CleanUpFunction is invoked periodically by CloudWatch in order to empty and deactivate expired mailboxes. It also takes care of deleting session records that are also expired.
A scan is performed on the addresses and sessions tables, checking the value of the TTL attribute.
## part of CleanUpFunction, see Github repository for
## the complete functions code.

def cleanup():
    ## get expired addresses
    try:
        response = addresses_table.scan(
            FilterExpression = Attr('TTL').lt(int(time.time())),
            ProjectionExpression = "address"
        )
    except ClientError as e:
        logger.error('## DynamoDB Client Exception')
        logger.error(e.response['Error']['Message'])
    else:
        for I in response['Items']:
            find_emails(I['address'])
            delete_address_item(I['address'])
Backend – API
API Gateway is used as a REST (regional) endpoint for the web application.
Lambda integration is used with three lambda functions dedicated to creating a new mailbox (CreateEmailFunction), consulting the list of emails present (GetEmailsListFunction) and downloading the content of a specific email (GetEmailFileFunction).
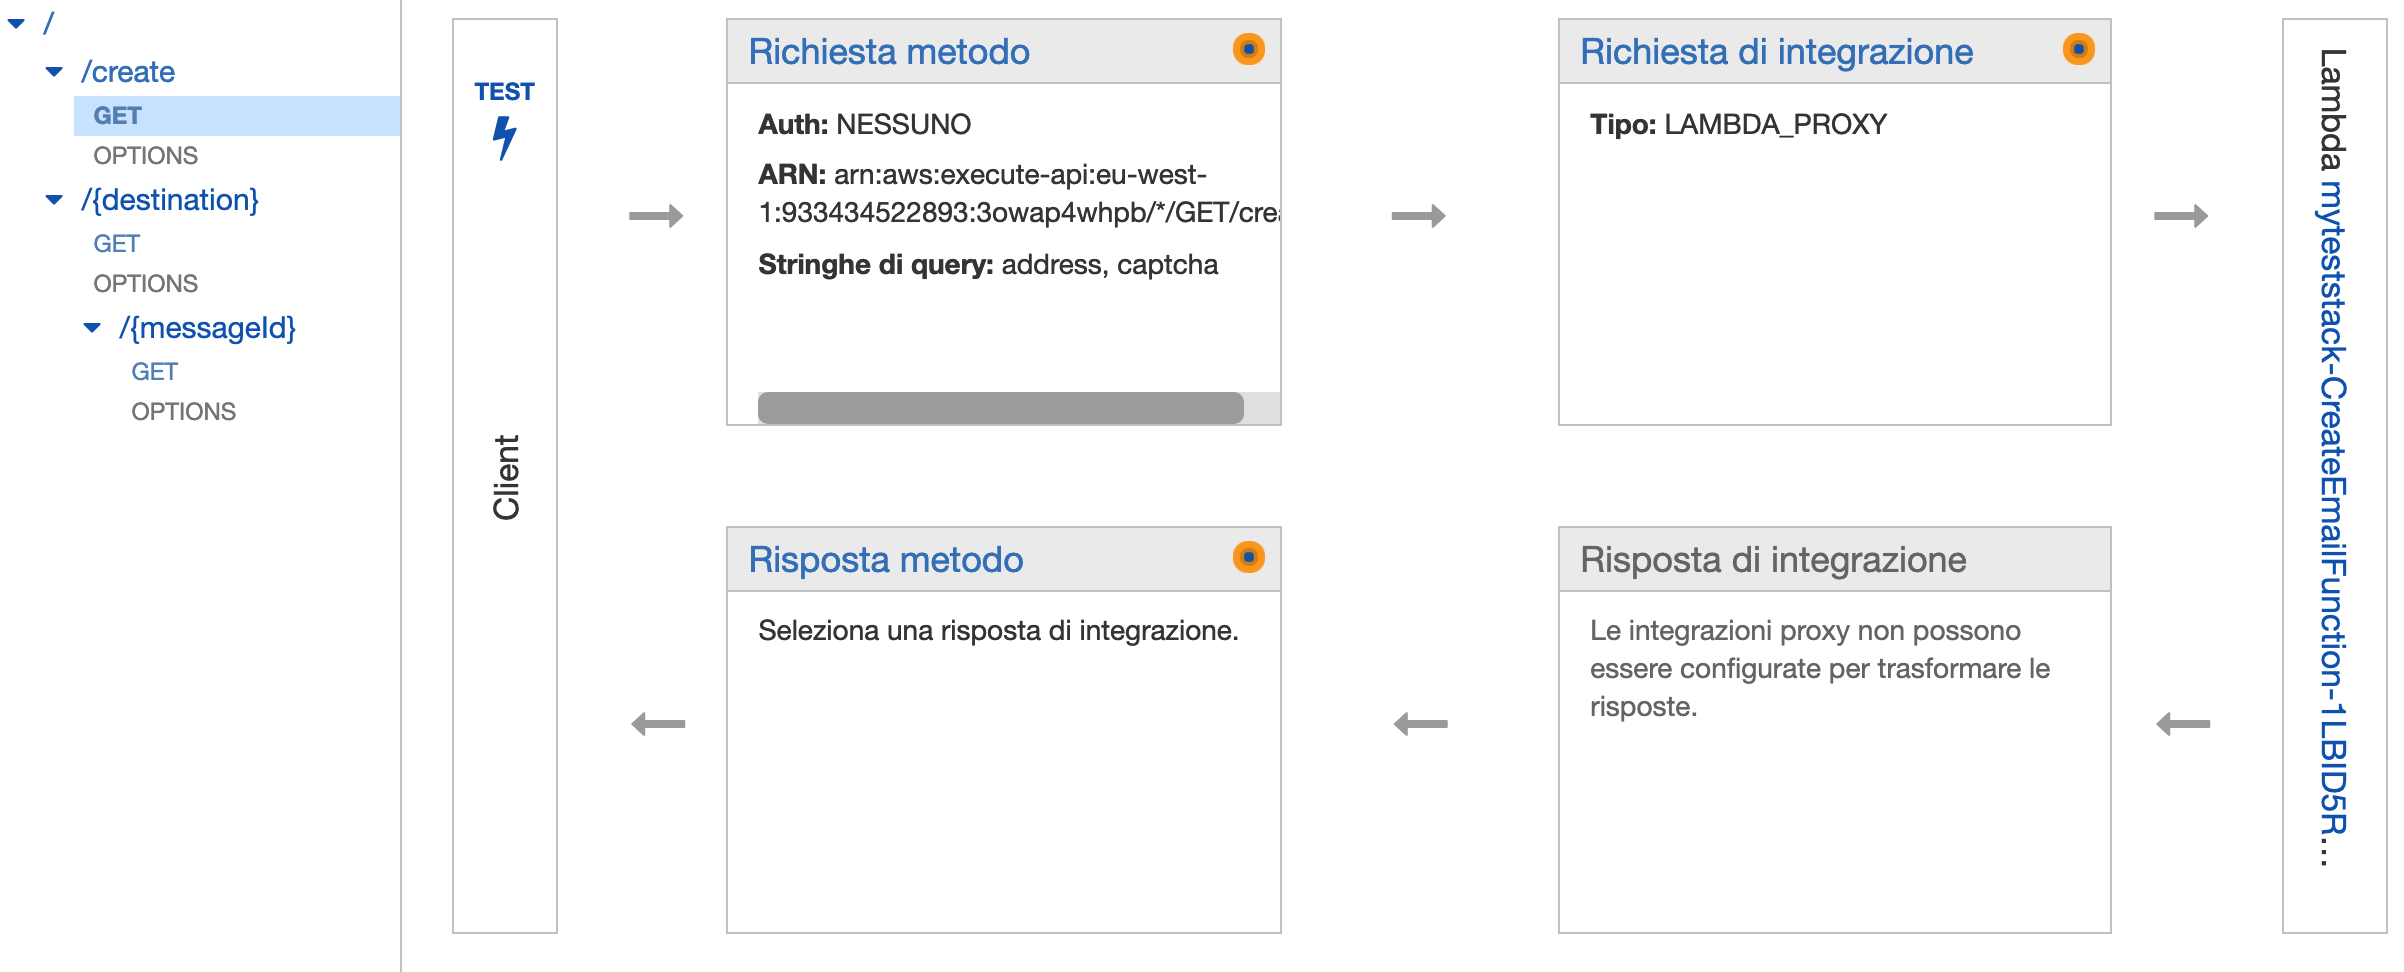
The CreateEmailFunction function responds to the GET method of the /create resource and has two parameters:
- address – email address to be created / to log-in
- captcha – verification code
Both parameters are validated and, in case the email address does not exist, the same is created by inserting the relevant record in the addresses table. The function returns a sessionID parameter in the body which will be used by the client for further API calls. Valid session IDs and their expiration are stored in the sessions table.
## part of CreateEmailFunction, see Github repository for
## the complete functions code.

import http.client, urllib.parse
import os
import re

valid_domains = os.environ['valid_domains'].split(',')
recaptcha_key = os.environ['recaptcha_key']

## A very simple function to validate email address
def validate_email(address):
    valid = False
    # Do some basic regex validation
    match = re.match('^[_a-z0-9-]+(\.[_a-z0-9-]+)*@[a-z0-9-]+(\.[a-z0-9-]+)*(\.[a-z]{2,4})$', address)
    if (match != None):
        domain = address.split("@")[-1]
        if domain in valid_domains:
            valid = True
    return valid

## reCAPTCHA validation function
def validate_recaptcha(token):
    conn = http.client.HTTPSConnection('www.google.com')
    headers = {"Content-type": "application/x-www-form-urlencoded"}
    params = urllib.parse.urlencode({'secret': recaptcha_key, 'response': token})
    conn.request('POST', '/recaptcha/api/siteverify', params, headers)
    response = conn.getresponse()
    r = response.read().decode()
    r = json.loads(r)
    return r['success']
The GetEmailsListFunction responds to the GET method of the /{destination} resource where the {destination} parameter is the mailbox address. The function validates the sessionID parameter provided in the request (queryString) and returns the list of emails in the mailbox in JSON format
The list of emails is obtained through a Query on the emails table.
## part of GetEmailsListFunction, see Github repository for
## the complete functions code.

dynamodb = boto3.resource("dynamodb")
emails_table = dynamodb.Table(os.environ['emails_table_name'])
sessions_table = dynamodb.Table(os.environ['sessions_table_name'])

## Get emails list from DB
def get_emails(destination):
    items = None
    try:
        filtering_exp = Key('destination').eq(destination)
        response = emails_table.query(KeyConditionExpression=filtering_exp)
    except ClientError as e:
        logger.info('## DynamoDB Client Exception')
        logger.info(e.response['Error']['Message'])
    else:
        #Remove private bucket details
        for i in response['Items']:
            i.pop('bucketObjectKey', None)
            i.pop('bucketName', None)
        items = {'Items' : response['Items'], 'Count' : response['Count']}
    return items

## Verify session
def session_is_valid(sessionid):
    valid = False
    try:
        response = sessions_table.get_item(
            Key={
            'sessionId': sessionid
            }
        )
    except ClientError as e:
        logger.info('## DynamoDB Client Exception')
        logger.info(e.response['Error']['Message'])
    else:
        if 'Item' in response:
            item = response['Item']
            if item['TTL'] > int(time.time()):
                valid = True
    return valid

def lambda_handler(event, context):

    headers = {
        "access-control-allow-headers":
           "Content-Type,X-Amz-Date,Authorization,X-Api-Key,X-Amz-Security-Token",
        "access-control-allow-methods":
           "DELETE,GET,HEAD,OPTIONS,PATCH,POST,PUT",
        "access-control-allow-origin": "*"
    }

    if session_is_valid(event["queryStringParameters"]["sessionid"]):
        destination = event["pathParameters"]["destination"]
        items = get_emails(destination)
        if items != None:
           result = {"statusCode": 200, "body": json.dumps(items), "headers": headers }

    return result
The GetEmailFileFunction function responds to the GET method of the /{destination}/{messageId} resource where the {destination} parameter is the mailbox address and {messageId} is the unique identifier of the mail. Also this function checks the sessionID provided in the request (queryString).
It returns the content of the mail by reading it from the S3 bucket and sets the email record in emails table as readed, changing the isNew attribute to “false“.
## part of GetEmailFileFunction, see Github repository for
## the complete functions code.

dynamodb = boto3.resource("dynamodb")
emails_table = dynamodb.Table(os.environ['emails_table_name'])
s3 = boto3.client('s3')

## Get emails details, including s3 bucket and s3 bucket object key.
def get_email_file(destination, messageId):
    result = None
    try:
        response = emails_table.get_item(
            Key={
            'destination': destination,
            'messageId' : messageId
            }
        )
    except ClientError as e:
        logger.info('## DynamoDB Client Exception')
        logger.info(e.response['Error']['Message'])
    else:
        if 'Item' in response:
            result = response['Item']
    return result

## Set item ad readed in DynamoDB table
def set_as_readed(destination, messageId):
    try:
        response = emails_table.update_item(
            Key={
            'destination': destination,
            'messageId' : messageId
            },
            UpdateExpression="SET isNew = :updated",
            ExpressionAttributeValues={':updated': 'false'}
        )
    except ClientError as e:
        logger.info('## DynamoDB Client Exception')
        logger.info(e.response['Error']['Message'])

def lambda_handler(event, context):

    headers = {
        "access-control-allow-headers":
           "Content-Type,X-Amz-Date,Authorization,X-Api-Key,X-Amz-Security-Token",
        "access-control-allow-methods":
           "DELETE,GET,HEAD,OPTIONS,PATCH,POST,PUT",
        "access-control-allow-origin": "*"
    }

    email_file = get_email_file(destination, messageId)
    if email_file != None:
        data = s3.get_object(
            Bucket=email_file['bucketName'],
            Key=email_file['bucketObjectKey'])
        contents = data['Body'].read().decode('utf-8')
        headers.update({"content-type": "message/rfc822"})
        result = {
           "statusCode": 200,
            "headers": headers,
            "body":  contents
        }
        if email_file['isNew'] == 'true':
           set_as_readed(destination, messageId)

    return result
In order to enable CORS, an OPTION method has been added for each resource managed by API Gateway. In addition, lambda functions return specific CORS headers.
The CloudFormation template creates the API distribution and the related stage in order to obtain a valid endpoint. API endpoint URL is used to configure client web application.
Backend Installation
Once you have finished configuring the SES service for your domain as explained in the First Steps section, we use a CloudFormation template to build the entire backend infrastructure. The template provides for the creation of the S3 bucket, DynamoDB tables, all lambda functions and APIs. It also provides creation of all IAM roles, permissions and services configuration, including the Amazon SNS topic.
AWSTemplateFormatVersion: 2010-09-09
Description: Disposable Email

Parameters:
    DomainName:
        Description: Domain name to be used
        Type: String
    ReCaptchaPrivateKey:
        Description: ReCaptcha private key to validate mailbox creation requests
        Type: String
        Default: ""
    AddressesTableName:
        Description: DynamoDB table to store valid addresses
        Type: String
        Default: "disposable_addresses_table"
    EmailsTableName:
        Description: DynamoDB table to store emails
        Type: String
        Default: "disposable_emails_table"
    SessionsTableName:
        Description: DynamoDB table to store client sessions
        Type: String
        Default: "disposable_sessions_table"
    RuleSetName:
        Description: SES RuleSet name to be used
        Type: String
        Default: "default-rule-set"
    MailboxTTL:
        Description: Life (seconds) of mailbox
        Type: String
        Default: "3600"
    SessionTTL:
        Description: Session expiration in seconds
        Type: String
        Default: "600"
    SourceBucket:
        Description: Lambda functions source S3 Bucket
        Type: String
        Default: "cfvn"
The sources of the lambda functions are not directly written in the template but in external python files. During stack creation, ZIP files of lambda functions must be hosted in an S3 bucket. You can specify a different bucket (default is my “official” public bucket) using SourceBucket parameter. This is required if you need to customize lambda functions before creating the stack.
To build the entire backend infrastructure you can use the CloudFormation console or AWS CLI:
aws cloudformation create-stack --stack-name <name> --template-url <url> --parameters <parameters> --capabilities CAPABILITY_IAM| Description | Example | |
| <name> | Stack name | disposable_stack |
| <url> | Template URL | https://cfvn.s3-eu-west-1.amazonaws.com/disposable.yml |
<parameters> is the list of parameters to be provided to the template. The two main and mandatory parameters are DomainName and ReCaptchaPrivateKey.
ParameterKey=DomainName,ParameterValue=<your_domain>
ParameterKey=ReCaptchaPrivateKey,ParameterValue=<your_private_captcha_key>
Once the stack is created, we need to know the newly created endpoint to be used in web application configuration. This is provided by CloudFormation as an output value. It is possible to get it in the CloudFormation console or directly from AWS CLI:
aws cloudformation describe-stacks --stack-name <name> --query Stacks[0].Outputs[0].OutputValueFrontend application
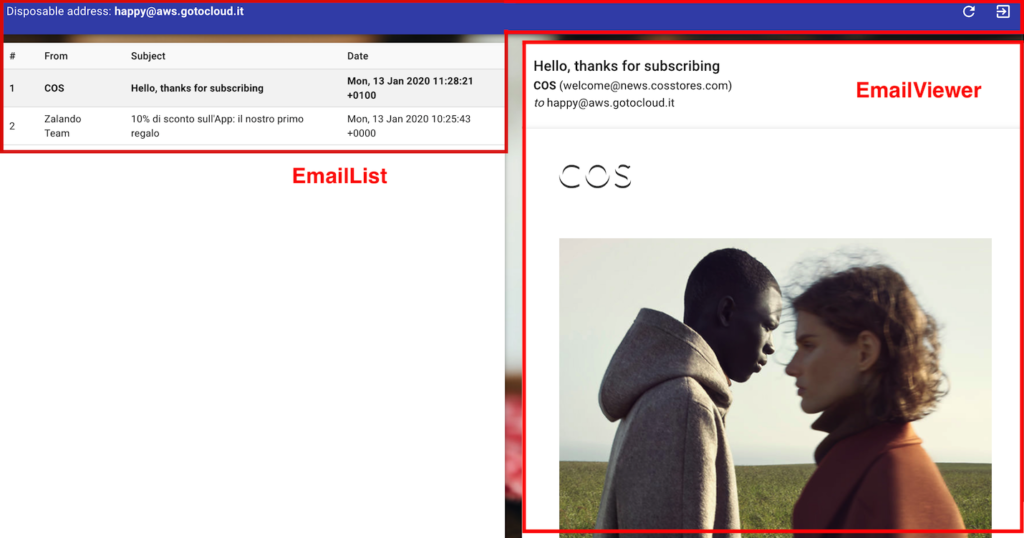
The React / Material-UI application is very simple: it consists of three simple components: LoginForm to allow creation and mailbox login, EmailList to list mailbox messages and EmailViewer to view the content of an email.
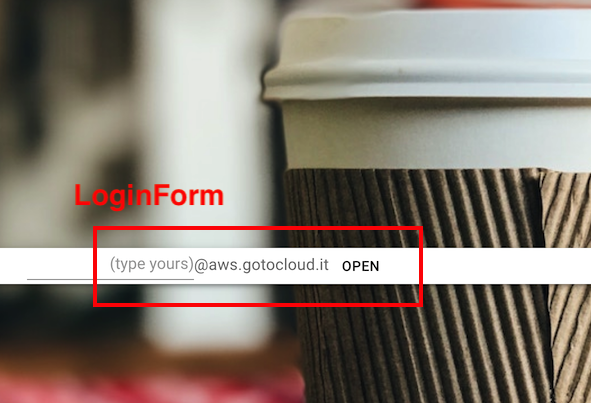
The main component App state stores the email address and the session ID, both initially empty. The LoginForm component is built to manage the login process.
<LoginForm changeAddress={this.changeAddress.bind(this)}
           apiEndpoint={APIEndpoint}
           recaptcha_key={ReCaptcha_SiteKey}
           email_domain={email_domain}/>
The LoginForm component includes the reCAPTCHA component and calls the /create API in the form’s onSubmit event.
handleSubmit(event) {
        const recaptchaValue = this.recaptchaRef.current.getValue();
        if (recaptchaValue === '') {
           window.location.reload();
        } else {
            console.log("Captcha value:", recaptchaValue);

          fetch(this.props.apiEndpoint + 'create?address='
             + encodeURI(this.state.address + this.props.email_domain)
             + '&captcha=' + recaptchaValue)
          .then(r =>  r.json().then(data => ({status: r.status, body: data})))
          .then(r => {
            console.log(r);
            console.log('Response from API: ' + r.body.message);
            if (r.status === 200) {
              this.props.changeAddress(this.state.address + this.props.email_domain, r.body.sessionid);
            }
        })
        .catch(console.log);
        }
        event.preventDefault();
    }
After login, the App component build the EmailList component.
<EmailList address={this.state.address}
           sessionid={this.state.sessionid}
           changeAddress={this.changeAddress.bind(this)}
           apiEndpoint={APIEndpoint}/>
The EmailList component calls the /{destination} API to get the list of emails stored in selected mailbox.
getList(force) {
        fetch(this.props.apiEndpoint + this.state.address +
              '?sessionid=' + encodeURI(this.props.sessionid))
        .then(response => {
            const statusCode = response.status;
            const data = response.json();
            return Promise.all([statusCode, data]);
          })
        .then(res => {
            console.log(res);
            if (res[0] === 400) {
                this.logout();
            } else {
                res[1].Items.sort(function(a,b){
                    if (a.timestamp > b.timestamp) { return -1 } else { return 1 }
                });
                if ((this.listIsChanged(res[1].Items) || force)) {
                    this.setState({ emails: res[1].Items });
                    if ((this.state.selectedId === '') && (res[1].Items.length > 0)) {
                        this.setState({ selectedId: res[1].Items[0].messageId });
                    }
                }
            }
        })
        .catch(console.log)
    }
It creates an EmailViewer component to show the selected message contents.
<EmailViewer address={this.state.address}
             messageId={this.state.selectedId}
             sessionid={this.state.sessionid}
             apiEndpoint={this.props.apiEndpoint}/
Show email content is the most complex part of the client application. Once the content has been obtained by the /{destination}/{messageId} API, it is required to parse it.
For this purpose, the emailjs-mime-parser library is used: it allows to access the different parts of the email. The getMailContents function selects the correct body part to be shown, giving precedence to HTML contents.
To view HTML content we use a very dangerous “trick”:
<div className="body" dangerouslySetInnerHTML={{__html: this.state.messageData}} />Frontend Installation
To create the React web application, once the repository has been cloned, it is required to configure some parameters at the beginning of App.js file:
//  - your APIEndpoint
const APIEndpoint = <your_API_endpoint>;

//  - your ReCaptcha Site Key
const ReCaptcha_SiteKey = <your_reCAPTCHA_site_key>;

//  - your email domain
const email_domain = <your_domain>;
Use npm start to test the application and npm run build to prepare files to be placed on your favorite hosting or, as I did, directly in a public S3 bucket. Remember to enable the “localhost” domain in reCAPTCHA configuration to be able to test your application locally.
Conclusions
In this GitHub repository are available sources of the React application and the CloudFormation template to create your AWS backend.
Disposable-mail was born as an example of a cloud-native solution. Many aspects need improvements (security in example). Fell free to suggest any improvements. However, I hope this is a good starting point to create your disposable webmail service.
We had fun? See you next time!