

Build AWS Lambda CI pipeline with Goss and TravisCI
I recently written about how to develop AWS Lambda functions offline, using the docker images of LambdaCI . Starting from the Python environment used for the development of a sample Lambda function, let’s see how to create a Continuous Integration pipeline that deals with testing it for each new commit. We use Goss as a test tool and TravisCI for the implementation of the CI pipeline.
AWS Lambda in a Docker container
Let’s quickly see how to run an AWS Lambda function in a Docker container.
We use the following Python function, which deals with processing messages queued on SQS and which requires a package (PILLOW) normally not installed in the default Lambda environment.
To create the required docker image for the execution of our Lambda function, Dockerfile is the following, which starting from the image lambci/lambda:python3.6, allows the installation of any additional Python packages envisaged in requirements.txt
Please check this post for more details; now we have our Docker image and our Lambda function is correctly running in a container. We are ready to start building the test suite.
Goss and DGoss
I chose to use Goss as a test tool mainly for these reasons: thanks to the wrapper DGoss, it is possible to interact directly with a docker container both for the execution phase and during the development (or editing) of the tests. The main purpose of Goss is to validate the configuration of a server, which in our case is precisely the container running the Lambda function. Test suite can be generated directly from the current state of the server (or container) making the operation very fast and practical.
Test suite is defined by YAML files.
We proceed very quickly with the installation of Goss and DGoss and we start the container that will allow us to create the test suite, using the Makefile syntax.
This command starts the container docker in “STAY OPEN” mode: API server listen on port 9001 and our Lambda function replies to HTTP requests. The parameter edit indicates to DGoss that we are going to use the container for the creation of the test suite. The test directory purpose is to collect files needed to run the tests. For example, if we want to verify SQS messages process by lambda, some sample events (in JSON format) will be saved in this folder to be used during the tests.
At this point we can use any Goss command to create our test suite: if, for example, we want to verify the presence of the function handler file, we use the command:
goss add file /var/task/src/lambda_function.pyThe ADD option adds a new test to the configuration file goss.yaml , in our case to check for the presence of the specified file. Goss allows to check many configuration parameters of the environment where is running, such as the presence of files, packages, processes, DNS resolution, etc. The reference manual is very exhaustive.
Now let’s create a script that allows us to verify the response of our Lambda function.
#!/bin/sh
# /var/task/test/test-script.sh

curl --data-binary "@/var/task/test/test-event.json" http://localhost:9001/2015-03-31/functions/myfunction/invocations
We use curl to query the endpoint of our Lambda function by sending a test SQS event (the file test-event.json ). So let’s add another Goss test, this time of type command. The goss.yaml file will become like the following.
The command section includes the execution of the script that queries the Lambda function. We expect on stdout a JSON with specific content, which confirms the correct execution of the function. Of course this test is only an explanatory example of what can be done with Goss.
When we have finished defining the test suite, exiting the container (exit), DGoss will take care of copying the newly edited file goss.yaml to our local host, so that it persists after deleting the container. By starting the edit procedure again, the file will be copied to the new container and synchronized again at the end.
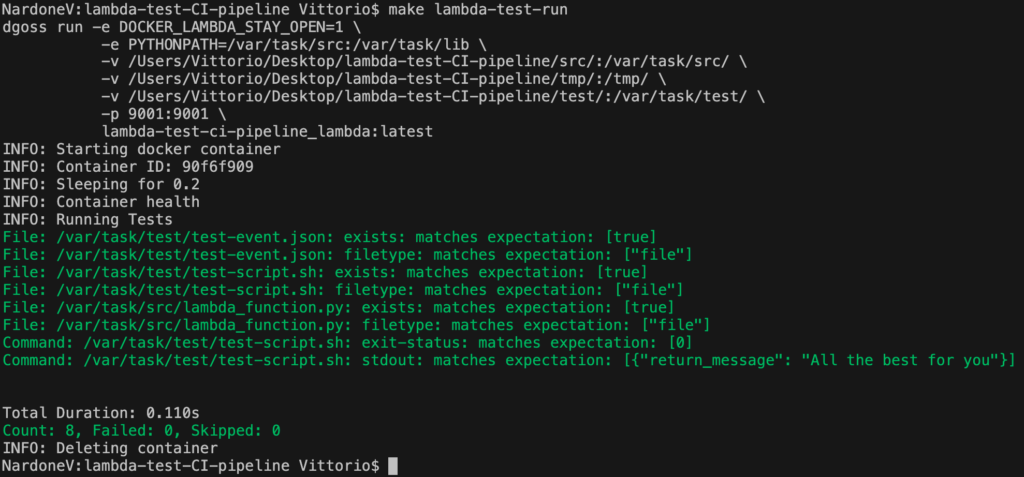
The time has come to test! Instead of edit , we simply specify the command run of DGoss.
DGoss creates a new container and runs the test suite. Here is an example.
Great! Our test suite is ready, let’s proceed to integrate it into our CI pipeline.
AWS Lambda CI with TravisCI
The time has come to configure the CI pipeline. I chose TravisCI for its simplicity and because it allows to build docker images for free. I also used it in this post with Ansible and it’s the CI tool that I prefer. To automate the testing process at each commit we configure TravisCI to monitor the GitHub / Bitbucket repository hosting the sources.
A simple file .travis.yaml creates the pipeline.
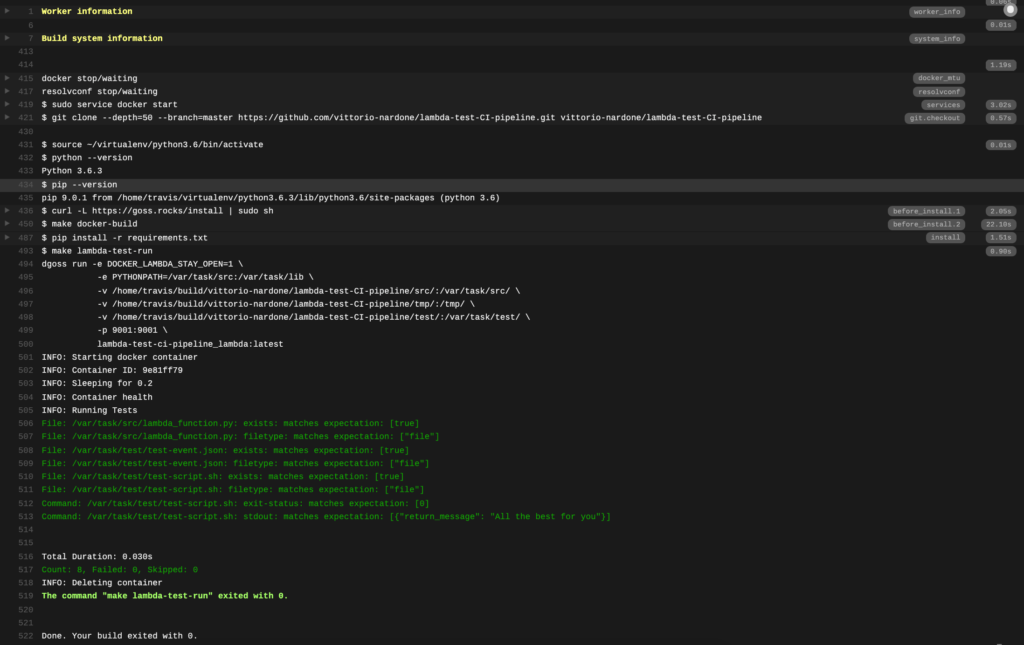
Let’s analyze it: the services directive instructs TravisCI to use the docker service. Before starting the tests, Goss / DGoss is installed and our AWS Lambda image is built, as specified in before_install. Finally script indicates the command for the effective execution of the test suite that we have prepared previously.
Here is the result:
Great! Our pipeline is done!
Conclusions

We took care of developing and automating the test of a simple AWS Lambda function without it ever actually entering the AWS cloud: I have used this environment working on some projects and I believe it allows to significantly speed up the development and maintaining of sources, allowing to deploy tested and quality code on AWS.
This GitHub repository collects what has been treated in this article and can be used as a starting point for building your own CI pipeline with Goss.
Did we have fun? See you next time!